Monday, December 9, 2013

Santa's Cookie Plate and Milk Mug

When I had my 3-year old twin cousins over last week, I sat them one at a time in my lap and held the Sharpie markers with them to create this cookie plate and milk mug for Santa. No, the design wasn't quite theirs, but they did have fun coloring with me I think. I actually bought Rudolph the Red-nosed Reindeer coloring books so that when the one wasn't coloring with me, they could color on their own, and just the way they wanted- LOL!

I went over the writing and made it more bold after the boys colored with me. When I was done, I put the plate and mug in the oven and baked them 30 minutes at 350 degrees as many Pinterest DIY pins say to do. This makes the Sharpie writing permanent.

They turned out great! Below shows Eliot in the process. Thanks for looking! Happy crafting and Merry Christmas! 


Sunday, December 8, 2013

Reindeer Food!!


Today I made "reindeer" food (while my pup drooled), added it to a couple of Dollar Tree containers, and then decorated the containers- so fun! I made them for two families that are "deer" to me- lol!!


The deer image was found on the internet and cut from vinyl on my Silhouette Cameo machine. Side note: I so love my machine!!!  The letters were cut using the CK Jolly Elf font. I got the tag and reindeer food recipe from this adorable blog: 
http://amandaparkerandfamily.blogspot.ca/2011/12/free-reindeer-food-tags.html?m=1

That's all for now. Happy crafting all! 

Sunday, November 17, 2013

Baseball Themed Baby Shower honoring a Grandpa!

Last week I hosted a party for a co-worker who was becoming a Grandpa! This man has been so good to our office with remembering everyone's birthdays with printouts of our horoscopes, planning the office parties and monthly lunches, sending cards when we're sick, etc. He does so much to treat us like friends as opposed to employees/co-workers, so I thought he deserved a party! After all, this was quite a milestone for him and he was so excited sharing details with us of his daughter's journey to adoption.

One thing you definitely need to know about him is that he is a HUGE Cubs fan! So even though baseball season was over (especially for us here in Chicago-lol), baseball was an obvious choice for a theme. We called it, "Celebrating Grandpa's Little Slugger."

Here was the invitation. I got the idea from Pinterest.
I actually created a board for this party if you're interested
in having a baseball theme party as well. 
The invitation was all done on the PC -
no fancy matting or anything. It was only given to him.
Everyone else was sent an email.

 This was a gift from me and the party "committee."
This gift also doubled as the game. Each item was wrapped
inside the Cubs bag and the guests had to guess what the item
was and guess whether Grandpa would guess it right. This
turned out to be a lot of fun. I used my Silhouette Cameo
to personalize some of the items. I purchased the bib
and blanket from fellow crafters on Etsy.
The winner of game received a book called,
"A Cub Fan's Guide to Happiness!" Too funny . . .
 
A close-up of the contents . . .

This was added last minute for an even 10 items inside the bag.

 Back of the "Grandpa's Diaper Bag" tag

What the bag and tag looked like before it was wrapped!

Here are my centerpieces, "concession stand" sign, &
some description cards for a few of the items.

Here is my "bat and baseball" favor -
Oreo balls and chocolate covered pretzels!
Certainly not professional-looking, but they were enjoyed.

The centerpieces were alternately filled with peanuts and
Baby Ruth fun size bars. The flag also included Grandma
on the other side since she was also invited to the party.

This is what our lunch room looked like
before the after-work party!
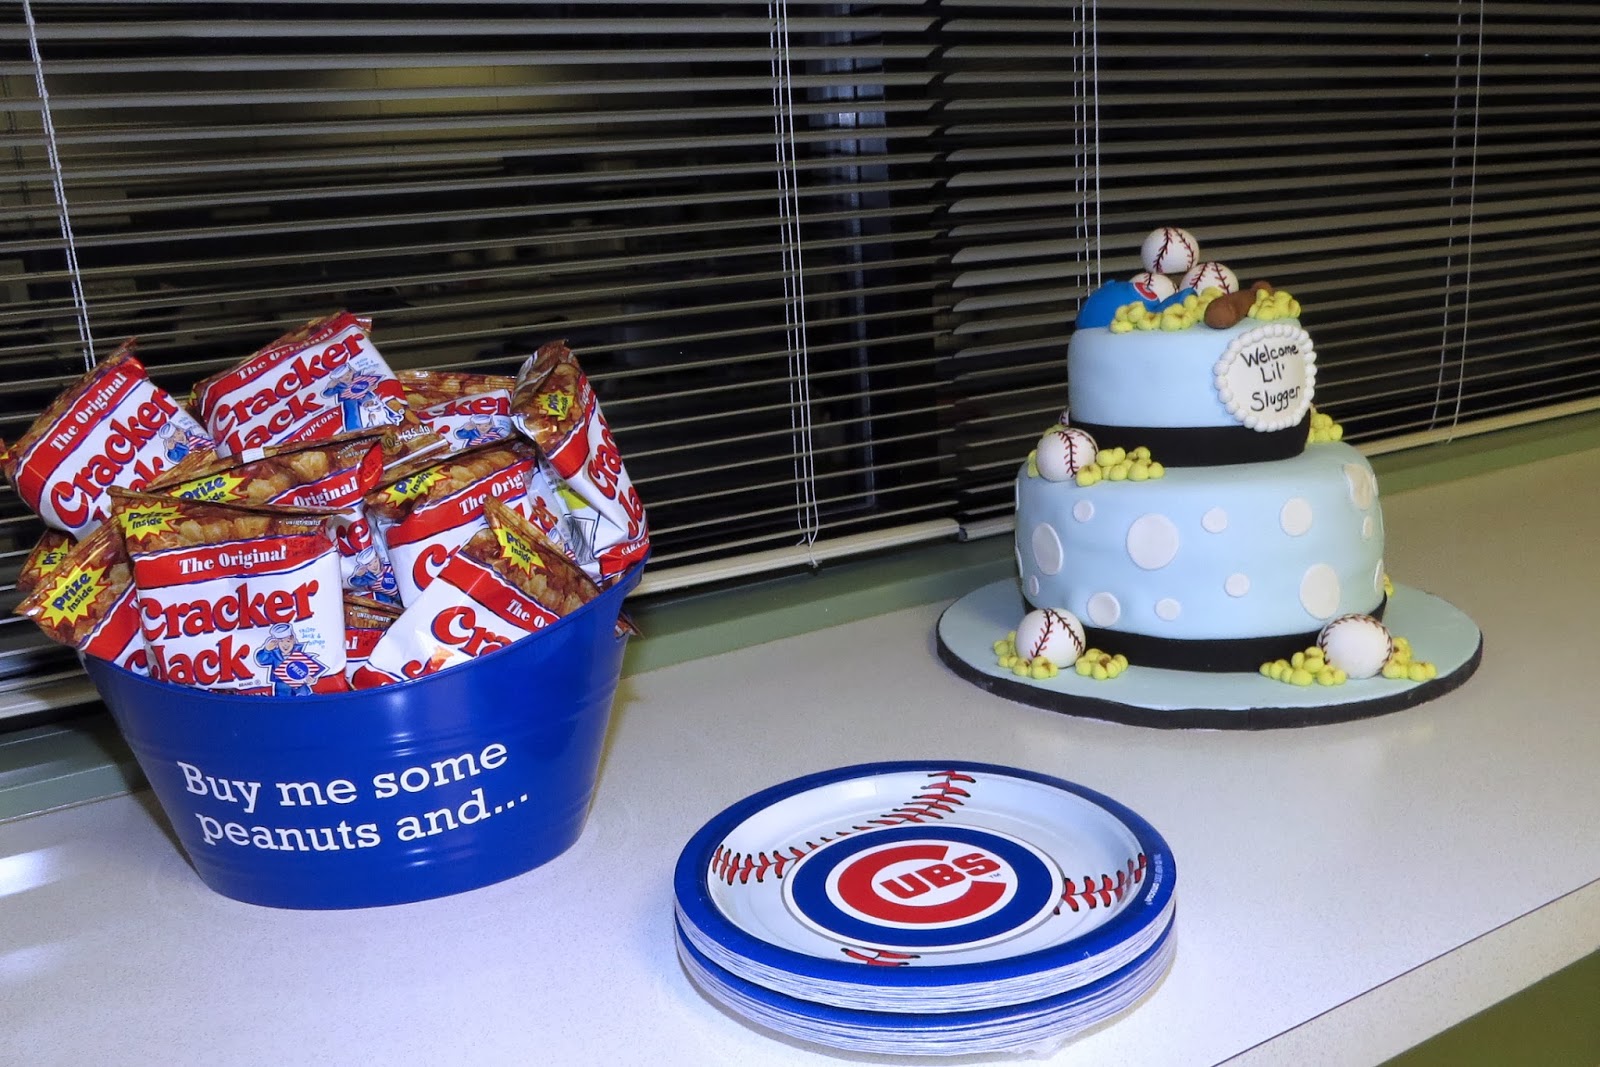
We catered hot dogs and fries to go with the theme.

How could we not have Cracker Jack?!
The beautiful cake was made by
here in the Chicago Suburbs. Her daughter works with us,
so I gave her a photo of one I saw on the internet and
her mom did a fabulous job of recreating it yet
added her own fun touches to it!

A co-worker of mine found a cool story to relate
Grandpa's favorite dessert, lemon bars, to the Cubs!
Apparently in the 1920s-30s, lemons were thrown at players
or refs that didn't do well in that fan's opinion!
I named the lemon bars "Sour Loser" Lemon Bars!

This is what the favors were displayed in.

I also made a banner with the grandson's name
based on an idea I found on Pinterest.
 
Here's the party in action! Grandpa was opening
gifts to the left.We were so happily surprised 
by his daughter and baby coming to the party!


 This party was a lot of fun to put together and I received so many compliments on it. That felt really good. Thanks for looking and happy crafting!
 

Saturday, July 27, 2013

Cupcake Card!

I finally played around with one of the many Miss Kate Cuttables freebies that I've been downloading since May- which is when I bought my Cameo. Her graphics are so adorable!! For this card, I didn't quite use the graphic as she had it, but it's general cupcake shape is from her. And of course I had to stickle it up! This is for my niece/Goddaughter. So far I like working with Miss Kate Cuttables. And I am loving my Cameo. :)


Saturday, July 13, 2013

New Bright Flower Wreath for the front door!

Thought I'd dust off the ole blog and join a challenge! I just discovered this Cameo Challenge blog through a page I liked on Facebook: http://cameocreationschallenge.blogspot.com/. So, I jumped into their current glitter challenge!

Between being tired of not seeing anything on my front door in quite a few months, and seeing so many great ideas on Pinterest, I decided to make a bright flowerful wreath for my front door! Oddly enough, though, the design idea didn't come from Pinterest for this one. It was from a wreath on the front door of a house in my neighborhood! I did use Pinterest for the felt flower tutorial, though, as I wanted a different felt flower than I had made in the past. 

For the "Welcome" word, I cut it out on my Silhouette Cameo using the Janda Happy Day font and hot pink glitter cardstock. Pink/yellow twisted baker's twine holds up the word, and sequins were added to the felt words for extra bling. Ahhh, feels good to have accomplished something this weekend that I've had on my to-do list for so long! :)


Thanks for looking! Happy crafting!!

Jen

Saturday, May 11, 2013

State Track Meet Luncheon

My oldest daughter thought going to State for basketball was so much fun that she wanted to go back in track. She succeeded, so a special lunch was planned at school to celebrate the athletes that made it into the State track meet. 

I signed up for dessert and table decorations, so I came up with an ice cream sundae bar for the dessert and Pixy Stix centerpieces! I added some fun inspirational sayings to the ice cream toppings and made the sign. The centerpieces were dollar store cups, Pixy Stix, and vinyl applied to the cups. 

The kids seemed to enjoy their special lunch. Go Eagles!!


Sunday, April 28, 2013

Movie Night Gift Card Using Cricut Artiste!

I made this gift card holder for a family friend and his son to thank them for moving my old sofa out and new one into my house last weekend. I used the Cricut Artiste cartridge for the pocket and the ticket shaped holder, and my PC to personalize the ticket. Thanks for looking! Happy crafting!


Thursday, April 18, 2013

Blue's Clues Birthday Party - The Treats!

To wrap up the Blue's Clues party, here are the treats that I made with help!

First off, I purchased # 3 molds and lollipop sticks from Etsy.
I LOVE Etsy! I got a lot of stuff for the party from there!
And then as you can see, I made the #3 chocolate lollipops!
My oldest daughter helped with making these.

Before I got in the "rhythm" of making the chocolate lollipops
in bulk, I melted chocolate while the molds were still freezing
a previous lollipop batch. I panicked, so I got out some
pretzel rods to use up the melted chocolate! Turned out to
be a good panic. The party guests dug the dipped pretzels!

For the next edible craft, I dug out my BRAND NEW Cricut
Cake machine and made paw prints out of gum paste.
Previously my oldest daughter had the Cricut Cake Mini,
but at some point I was able to snag the large model
for $50 brand new. I did some research thanks to Pinterest and
got a lot of great tips on using the Cricut Cake for this project
and it worked very well. No problems!

My daughter and her friend attached the little paw prints to our
white-chocolate covered Oreos! I used circles from one of my
Cricut cartridges (Art Philosophy, I think?) because the actual
Blue's Clues paw prints from the show are more circular. The
circles were all laid out on my Gypsy, which worked out great.

Here are the Blue's Clues White Chocolate covered Oreos!
They're a little imperfect, but still looked good & tasted yummy!

The night before the birthday party, I had the
guests of honor overnight so I put them to work, too!
They made Blue's Clues sugar cookies!

Ok, so they ate the cookies that they decorated
which left me with decorating the rest, but it was
so much fun making the cookies with the boys!


Our finished Blue's Clues Cookies!

And the packaged #3 lollipops complete
with a "thank you for coming" tag!

 
I can't take credit for the cakes, but thought I'd show
them in this post. My cousin made them using a
Blue's Clues pan. They turned out AWESOME!

And here is the table at the party with the packaged
goodies on it!I got the blue pail & bucket at the dollar store
and personalized them with vinyl. I used Zoo Day for
the boys' names and "is," and then Birthday Bash for the
# 3. I wanted the 3 to be a bit more perfect so it was more
easily identified by the birthday boys. I figured that their
mom can use these buckets to hold small toys or
miscellaneous stuff in their rooms after the party.
 
 
So that's it for crafting and this party. I had so much fun with this theme! I wasn't crazy about the theme when I first heard about it, though. I thought for sure it would be Thomas the Train since the boys love that! And since Blue's Clues the show was canceled back in 2006, it was harder to get things. But, once I started doing some research (thank you Pinterest and Etsy!!), I got REALLY into Blue's Clues. I tend to do that, though, with the parties I craft for. My room seems so bare now without all of the blue -LOL!
 
Thanks for visiting!

Blue's Clues Birthday Party - More Decorations!

More crafty projects for the big Blue's Clues Party: 

I made cards for the boys using an online Blue's Clues
printable envelope, and I used vinyl to make
"Pail and Shovel" to hold my gifts to the boys!

Names cut with vinyl using the Zoo Day cartridge!

The kid party favors - jumbo crayons from the dollar store
and 3 Blue's Clues coloring sheets with a thank you tag!

These were the prizes for the "Pin the Clue on Blue"
game and the bean bag toss game
(Got the handmade corn toss game on Etsy!)

Here are the assembled gifts from me: Blue's Clues 
Beanie Babies, bubble wands, personalized birthday shirts
(also from Etsy), Blue's Clues flash cards purchased from
eBay, and used Blue's Clues Look-n-Find and Read Together
books from Amazon's Marketplace. Buying used was being
"green" and was very inexpensive which 
justified me getting more for the boys. :)


These were the sippy cups I made for the under 2 kids.
And while I was at it, I personalized some older
cups for the birthday boys, and then a
BIG sippy cup for their mommy - LOL!

And finally, I bought party hats from the dollar store
and personalized them for the birthday boys!
 
That's about it for this post. Next up is the treats post!
 
Thanks for visiting!