Showing posts with label CC Alphalicious. Show all posts

Thursday, April 18, 2013

Blue's Clues Birthday Party - More Decorations!

More crafty projects for the big Blue's Clues Party: 

I made cards for the boys using an online Blue's Clues
printable envelope, and I used vinyl to make
"Pail and Shovel" to hold my gifts to the boys!

Names cut with vinyl using the Zoo Day cartridge!

The kid party favors - jumbo crayons from the dollar store
and 3 Blue's Clues coloring sheets with a thank you tag!

These were the prizes for the "Pin the Clue on Blue"
game and the bean bag toss game
(Got the handmade corn toss game on Etsy!)

Here are the assembled gifts from me: Blue's Clues 
Beanie Babies, bubble wands, personalized birthday shirts
(also from Etsy), Blue's Clues flash cards purchased from
eBay, and used Blue's Clues Look-n-Find and Read Together
books from Amazon's Marketplace. Buying used was being
"green" and was very inexpensive which 
justified me getting more for the boys. :)


These were the sippy cups I made for the under 2 kids.
And while I was at it, I personalized some older
cups for the birthday boys, and then a
BIG sippy cup for their mommy - LOL!

And finally, I bought party hats from the dollar store
and personalized them for the birthday boys!
 
That's about it for this post. Next up is the treats post!
 
Thanks for visiting!
 

Sunday, January 20, 2013

Happy Birthday Sweet 16!

Whoa! Another post!! Posting mobile is so much easier than from my PC. Right now I'm typing this at McDs while my 2-year old cousins play. Don't worry, my teen daughters are chasing after them-LOL!

Last night was my niece's Sweet 16 birthday party so I made a special card for her. I used the Talking Tags app & labels again to create a special message for her. I found the oldie "Happy Birthday Sweet Sixteen" song on YouTube and used it along with my spoken greeting.

Can you tell I like this new found technology?? So fun!


Thursday, December 29, 2011

I'm Dreaming of A Vinyl Christmas!

Here are more of my Christmas projects I've done over the last couple of weeks. All of them involved vinyl in some way. Ya think I'm a little addicted???

This charger was for my friend. I totally CASE'd it
from a Cricut MB member named 5 Lil Monkeys'-
THANK YOU!!
Apparently she CASE'd it and added her own twist,
but she doesn't recall where she found it originally. 
No twist for me! I loved this design just as it is. And my
Gypsy and transfer tape made this a pretty easy project!


This was my first attempt at glass etching- a letter E using
the Gypsy Font digital cartridge that was preloaded on my Gypsy.
I haven't etched anything else to date, but I'm
guessing that a thicker glass will produce a better etching.
The ornament glass is super thin.

I wasn't especially fond of the Hallmark Godchild
ornament this year, so I thought I would go another route
for the 3 godkids that came into town this past Summer
and went to Legoland with me and my family.

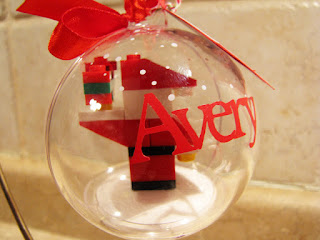
I purchased a set of 3 Lego Santa ornaments off of eBay.
I had my daughter assemble this Lego for the inside of the
ornament because this recipient is too young for Legos.
Also this ornament would act as a sample for the older 2 kids
to see what their ornament should look like
after they put their Lego together.

I personalized this ornament in red vinyl
with the Plantin Schoolbook cartridge.

Here is a view of the Santa Lego assembled.

Here are the 3 ornaments together ready to be put back
in the box- the fully assembled one for Avery and the other
2 for the kids that are old enough to put the Legos together.


I also added tags with a group photo from our
Summer Legoland adventure.


Bath & Body Works had cute mailboxes
with travel-sized holiday bath products in them.
I thought this was perfect for one of our young cousins.
And of course I had to personalize it!
I used the Cricut Alphalicious cartridge for her name.
Maybe she can use the mailbox to hold her valentines.

I also vinyled one of these mailboxes for my older daughter
as she admired it in the store earlier in the season.
The younger daughter got a Bath & Body works gift set
that had the bath products in a mini bath tub- so cute!
I vinyled her name on that, too, but didn't grab
a photo before she took apart the gift set. Oops!

I found these mini ornaments in the dollar section at Michael's.
My nephew plays both of these sports quite intently
so I thought this set was perfect for him.
And, yet again, I had to personalize with my
new favorite crafty medium - VINYL!
I used Plantin Schoolbook for the font cartridge.


Here is a little metal pail that I doctored with vinyl
for my adult niece. I added some Bath & Body Works
mini products-  just a little gift to let her know she is thought of.
The buckle was cut using the Cricut Art Philosophy cartridge
and the black "belt" was cut using a trimmer.I must say
that putting vinyl on something round like this was a bit tricky!


Ok, that's it for my Christmas projects. I really wanted to personalize all of my gift tags, but ran out of time. I felt really bad about it, but I think my family had a pretty good Christmas even without my personalized tags (sniff, sniff).

I am entering this post in Robin's Creative Cottage Link Up Party! Come join the linking fun! The party ends January 2nd, so pop by soon.
Thanks for stopping by! Have a very Happy New Year celebration all!!

Wednesday, November 2, 2011

Volleyball Coach Tumbler Gifts

Look out Vinyl Goddess Nicole! Jen has entered your tumbler-decorating realm and LOVES it - LOL!

Seriously, I've been loving the tumblers that Nicole has been decorating with vinyl on her blog, so I thought I would give it a try. I ordered my tumblers on Etsy from Saveacup. I ordered 12 tumblers (6 royal blue and 6 clear) and received free shipping. Their service was amazing! They answered my emailed question promptly, I was able to choose the colors, and they shipped the tumblers out right after I ordered them! They arrived well-packed, too. I would definitely order from them again.

So here are my decorated tumblers for my girls' volleyball coaches:


Supplies:
  • Tumblers from Saveacup on Etsy
  • White Cricut vinyl
  • Cricut Alphalicious font cartridge for lettering (welded on my Gypsy)
  • Cricut Sports Mania cartridge for volleyballs (duplicated many times on my Gypsy!!)
  • Michael's Whimsy Cottage and Fit To Be Tied ribbon (purchased last Winter)
  • Blue metallic shred for inside of tumblers
I am entering these tumblers into Paper Playtime's and Whimsical Wednesday's "Anything Goes" Challenges. Thanks for popping by and checking these out!
Happy November everyone! Have a good crafty remainder to your week!

Sunday, August 14, 2011

Personalized Tubs of LEGOS

So sorry for the delay in posting. Yikes I've been busy! And when I've managed to have a free moment, I've been so tired that all I've done is view my fellow crafters' blogs. My best friend was in town with her family, we babysat my baby cousins last weekend, and don't EVEN get me started on my job - BLAH!! Let's just say I'm SO HAPPY it's the weekend!!!!

Since I knew my BFF was going to be in town with her kids, I gave her twins their birthday gifts a little early. I rarely can give them in person with them living in North Carolina, so I planned a fun time for the kids by going to Legoland and giving them their gifts at the end of our time there. It was their own special birthday party! :)

Here are the gifts I gave them:


Supplies:
  • Cricut white vinyl
  • Cricut Birthday Bash cartridge welded on Gypsy for Alex
  • Cricut Alphalicious cartridge welded on Gypsy for Cassidy
  • Cricut Disney's Hannah Montana for stars on Alex's Lego tub (Shh! Don't tell him they were from Hannah Montana!)
  • Cricut "mystery" cartridge for circles on Cassidy's tub (I honestly don't remember what cartridge I used. I did a search on my Gypsy for a circle and pretty much picked the first one I saw where the cartridge was linked. Sorry!)
What a short supply list for a change! And this gift was quite the hit with both of the kids, my BFF, and other patrons in Legoland. I had a few people stop and ask if the store in Legoland did the personalizing - SO COOL! I love when people think that something is professional when it was something I crafted. Even my BFF thought I "had them done" somewhere! :)

I haven't done too many projects with vinyl, but WOW is it easy!!! And thank you to Nicole of Creative Delights By Nicole for emailing me suggestions for the tubs. She is the "Vinyl Goddess" I'm pretty sure!! If you haven't visited her blog, you should pop over. She does some amazing work!

Well, that's all for now folks. I will try not to be too much of a stranger, but I do have a full plate the next couple of weeks (insert heavy sigh here). Blessings on your coming week!

Sunday, May 1, 2011

Bring on the May Flowers!!

Happy May!! I'm so happy it's May - no more April showers, please!! And we're closer to more consistent warmer weather, being outdoors and school getting out - YES! I really enjoy as a Mom when we get to relax on the schedule and take a break from all of the school activities.

Since Mother's Day is less than a week away now, I thought I'd post something I made last month for my Grandmother's 90th Birthday, but could be made and easily given for Mother's Day:


I saw paper flower arrangements on the Cricut Message Board awhile back and was intrigued. And since my Grandma's memory is slipping away a bit, I thought this flower arrangement will help her remember who everyone is in our VERY large family.

Supplies:
  • Flower cuts and wooden-looking sign from Cricut Walk In My Garden cartridge
  • "Happy 90th Birthday" from the Cricut Alphalicious cartridge with wire attached to them
  • Green picks from the floral dept at Michael's (I had 25 family members to add to the arrangement, so I was lucky that 25 green picks came to a package!)
  • Moss, styrofoam piece (inside holding the picks), and flower pot (such a cute find!) from local dollar store 
  • LD Aloha font from Lettering Delights (Nice and bold for my Lil' Gram to read!)
  • Photos printed on photo paper and punched with a 1 inch punch
The project was a snap to put together. Gotta love that! I know I could have done much better on the flower designs, but there were so many family members to make flowers for, so I thought simple was best. It's already pretty crowded and overwhelming in the pot!

I'll be busy making my Mother's Day cards this week. Thank you to you all for the wonderful inspiration you've been providing on your blogs! Have a good week everyone!