Showing posts with label Parties. Show all posts

Sunday, March 18, 2012

2nd Scrappy Moms Sneak Peek - Pinwheel Centerpiece!

Hello, everyone! I hope you're enjoying a beautiful Sunday like I am! I'm digging this amazing weather!

Speaking of amazing, Scrappy Moms not only released a fun new stamp set this weekend, they released their very first metal die- A PINWHEEL!!!


My friend is throwing a chocolate-themed birthday party for her daughter in a couple of weeks, so I made this centerpiece using the awesome new Pinwheel Die:

The whole centerpiece!

A close-up of the center pinwheel with a sentiment flag
that has "Whirl away the day!" stamped on it
from Scrappy Moms' newest stamp set, Spring Fair!

A closeup of the left pinwheel with the SMS Spring Fair
sentiment, "When I'm down you turn me Around"

And then the right pinwheel with "You Blow me away!"
also from Scrappy Moms' Spring Fair

Here is a photo of the complete Spring Fair! stamp set:


Supplies:
  • Scrappy Moms' BRAND NEW Pinwheel die
  • All sentiments from Scrappy Mom's NEW stamp set, Spring Fair!
  • Cricut Imagine Yummy cartridge for patterned paper
  • Stampin' Up silver diamond-shaped brads for pinwheels
  • Stampin' Up Pretty In Pink cardstock for flags (cut with trimmer and scissors)
  • Stampin' Up Chocolate Chip ink
  • Wilton lollipop sticks (purchased at JoAnn)
  • Glue Dots brand craft dots to adhere pinwheels to lollipop sticks
  • Ashland vase purchased from Michael's
  • Hershey Kisses - Spring edition
  • Pink organza ribbon to wrap around vase
The pinwheel die is SO easy to use! It can be used with your Sizzix, Spellbinder or Cuttlebug die-cutting machine. I used my Cuttlebug! If you want to see how to use the die with Cuttlebug, Scrappy Moms design team member Sarah from Live Love and SCRAP! posted a fabulous video on it along with showing her awesome SM Pinwheel project! Check it out!

I will be back with more SM projects soon. And if you haven't entered my drawing for the Scrappy Moms' Mini Messages stamp set that I'm giving away, click HERE!

Thanks for stopping by! Have a great week!!!!!

Friday, February 3, 2012

Beach Party Thank-yous

Happy weekend all!

I FINALLY got the thank you notes out from my daughter's beach party last night:

Here is a 4x6 group print adhered to one side
of the postcard-style thank-you.

And then on the other side was a wallet-sized photo of
the recipient with the birthday girl and the gift given.
Some personalized text to thank each girl for the
gift was either below or to the side of the photo. 

Lastly, I added a "Stickled" tropical flower from the Cricut
Life Is A Beach cartridge as an embellishment.

Supplies:
  • 4x6 group prints
  • Wallet-sized photos of birthday girl with each guest
  • Cricut Life Is A Beach cartridge for tropical flower
  • White Georgia-Pacific cardstock for cards
  • Orange Recollections cardstock scraps for flowers 
  • Orange Peel Stickles to bling up flowers
  • Beach Type Font downloaded free from the Internet

These thank-yous are simple, yet personal. I've always made a point of taking a photo of the birthday kid with the guest and the gift given. Then I don't have to write down the birthday gifts. For this party, my daughter was so trained that she initiated the pics with each friend! I guess she should be trained after 13 years- LOL!

Well, off to another basketball tournament tomorrow, but maybe I can work on those valentines sometime in the next couple of days. Thanks for stopping by! Have a great weekend!!

Tuesday, January 24, 2012

Life's A Beach!

Aloha, my fellow crafters!

As I said in my last post, I survived my 13-year old's beach party this past weekend! If you missed seeing the invitations, you can view the post for them HERE.

Here we go:
Here's the party crew in front of the
 fabulous Oriental Trading beachy backdrop!
(Ok, so it was basically a plastic tablecloth split in
3 parts which lead me to LOTS of photo-editing
to make it look like a real backdrop, but it worked!)

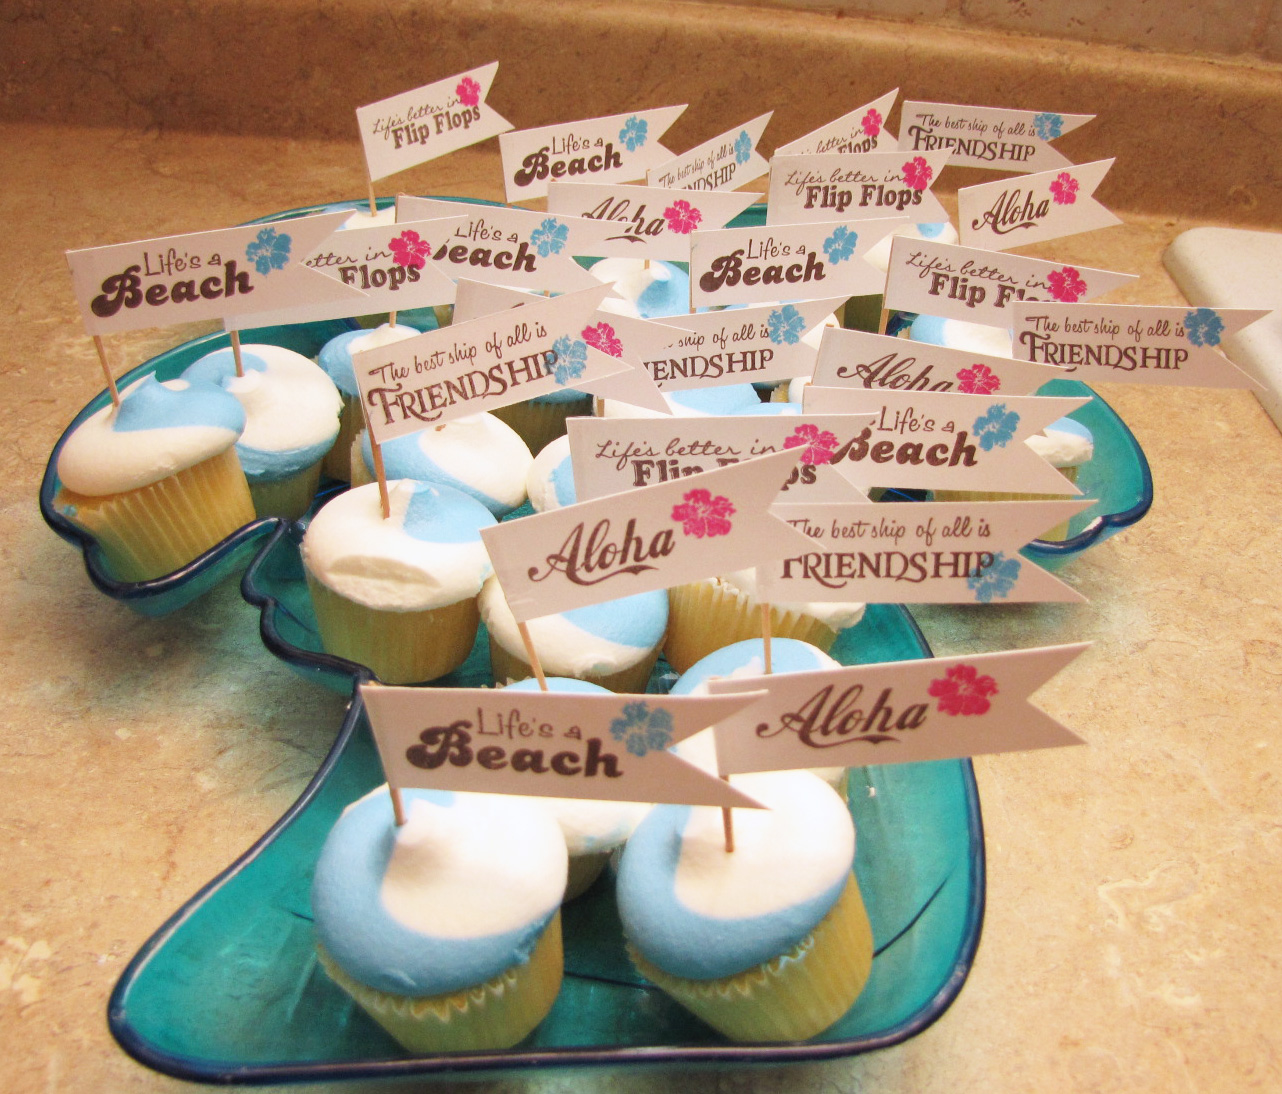
I picked up these cute wave-like mini cupcakes from Target
and decorated them with handmade toppers using
Scrappy Moms' Sun Kissed Stamp set - love that set!

Here's the powder room decorated in the beach theme!

My daughters made these Cricut creations using
the Life Is A Beach cartridge and Stickles.
They also made flowers for the party room
which you might spot in the party pics below.

We had a tropical hand soap, lotion and candle
all from Bath & Body Works to decorate the sink!

Also in the powder room is my Creative Memories
display frame. I decided last minute to add a photo of the
birthday girl when she was 1-year old at the beach!
Her friends really got a kick out of it!

The food served with shovels! And yes, those are
"Goldfish" swimming in that salsa- LOL!
The utensil caddy also had straws
and umbrellas for their drinks!

Here's the Goldfish Bar!
We had Pizza, Parmesan, Flavor Blast Cheddar,
Colored & Pretzel! The little trays were $1.50 for 12 of them
(6 fish 6 crabs) on clearance at Oriental Trading -Woot! Woot!

We usually have this Tiki bar on our enclosed
sun room, but the birthday girl talked her Dad into
carrying it down to the party room. Such a Daddy's Girl! 
I must say it made a nice addition to the decor! We also
had a light up palm tree in a corner (see tug pic below).

Here is the dessert and gift table!
How lucky was it that I found a tropical pattern
for a 13th birthday? TOTALLY lucky!!
The candy bar!
We had Swedish fish, sugary orange slices,
tropical-colored Sixlets & Starbursts in the reds!
The palm tree tray had mini sugar cookies from Target.

We also gave out Popsicles after the fast-paced games
and had ice cream cups to serve with the mini cupcakes.
I've found that so much gets wasted at parties like this,
so I think mini is the way to go! And the ice cream cups were
a convenience in not having to scoop ice cream and deal
with the mess. Would definitely go that route again. And to my
surprise, the girls really liked them and wanted the tiny
wooden spoons that came with the cups - LOL!

The large sand buckets on the left were prizes.
They were filled with full-sized tropical scented 
Bath & Body Works shower gel, lotion & lip gloss
all 75% off right after Christmas. I think it was seeing these
items at B&BW that gave me the beach party idea. The favors
are to the right in the photo. More pics & deets of those below.

Elimination beach volleyball!
Whoever made the beach ball drop to the ground,
either by a bad hit or not getting to it, was out. We eliminated
until we had a volley between 2 girls & then got a single winner.

The net was actually fish net purchased
in my order from Oriental Trading.

Musical Beach Towels!
This was just like musical chairs, but each player had to
"strike a pose" on the beach towel once they got to one.

Down to three contestants and just 2 towels!

Tug-Of-War!
We made a dolphin using the Cricut Life Is A Beach
cartridge and hooked it to the rope with a paper clip.
Each team was trying to land the dolphin on their towel.
The girls totally pulled their muscles out & got into this game!

The girls also did a round of limbo, but I video'd it and haven't
successfully extracted any stills from it yet. That was fun, too!

Here's the birthday girl opening gifts "at the beach"- LOL!

And we just had to send our guests off
with a remembrance of their beachy time together!
Where did I get the items for the favor?
Bath & Body Works of course!

The lotions, anti-bacs with tye-dye holders,
Daquiri lip glosses and nail files were all on sale pretty cheap
at B & BW. The "Icy Breeze"mints were in a package of 4
from the dollar store. I was going to go with bubble gum, but
at this age many of the girls have braces, so gum is a no-no.

The pails were from Oriental Trading, and came with little
sand tools. I used the shovels for decorations to the food.
When the pails first arrived, I didn't like how small they were,
but they ended up working out perfectly for what I put in them.


I used vinyl and the Cricut Life Is A Beach cartridge font
for the personalizing of the pails. The tags were printed on my
computer (back message) using Beach Type font downloaded
from the Internet & stamped with Scrappy Moms'
"Mahalo" stamp from their Sun Kissed set for the front.
The ribbons were in my stash,
but purchased from Michael's last year.

Here are all 12 in a colorful rainbow!
We did have 3 girls that were not able to attend, so I gave
pails to my non-bday daughter & her friend that was over.
And then that left one pail for me - LOL!

I have had lots of positive feedback from the girls' parents,
so I think I can officially consider it a successful event!


Thanks for stopping by and getting through this very photo-heavy post! Have a great day!

Sunday, January 8, 2012

Indoor Beach Party Slider Invitations!

I can't believe it's January and I haven't seen any real snow yet! There were a couple of days in December where we received light "dustings," but it melted pretty much right away. Our temperatures have been mild, which is not usual. I guess I'm not complaining because the snow can be a pain, but I do feel bad that my kids haven't been able to enjoy it.

But while we've had these mild temperatures, it's still not warm enough to get away with shorts, tees and flip flops! But later this month my teen-aged daughter (wow, that's weird to type and read!) will be able to wear just that with her friends at her birthday BEACH PARTY!!

Here is the invitation that I came up with:

This is what it will look like
when each recipient receives it . . .

When you pull the straw out,
it reveals the party information!


Closer view of the party info pulled up and
the "Stickle-ing" (yep, that's a word) of the fruit!

One pulled up and one not!

Back view - the straw was cut and adhered
to the back of the party wording

And here are all 12 ready to go! My teenie-bopper
can deliver them on Monday morning at school! :)

Supplies:
  • Cricut Life Is A Beach Cartridge for pineapple, orange, cherry and "You're Invited" wording
  • Recollections cardstock in yellow, hot pink, orange and red
  • Georgia-Pacific white cardstock
  • Beach Type font downloaded for free from the internet
  • Paper umbrella toothpicks purchased from www.orientaltrading.com
  • Bendy straws that I just happened to have on hand-YES!
  • Candy Cane and Orange Peel Stickles
      Adhesives used:
  • ATG to adhere 2 pineapple pieces together and the cut-up straw to the back of the party wording
  • EK Success Zig 2-Way glue for orange layer and "You're Invited" wording
  • Micro Glue Dots for cherry and umbrella (rolled around tip of toothpick)
I'm kind of getting excited about this beach party-woohoo! It's definitely something fun to focus on to keep the "Winter Blues" away. I'm sure I'll have more to share on the party soon so stay tuned. In the meantime, thanks for looking!

** UPDATE!! The Party was a success!! See all of the details HERE! **

Have a great week, my fellow crafters!

Thursday, October 27, 2011

All Ghouls Halloween Party 2011 (Warning: Pic Heavy!)

As I said in my last post, my big Halloween bash was last weekend (see invitation here), at which I had 28 middle school ghouls in attendance - PHEW!! We had tons of fun, though! Wanna see?

Here was the schedule:

7-7:30          Ghouls arrived; voted on costumes, guessed candy
                     corn and witch's brew ingredients
7:30-8          Scavenger Hunt
8-8:20          Apple Bobbing
8:20-8:30     Announcement of Winners
8:30-10        Dance Party

The dessert table to "DIE" for!!

 Witch Finger butter cookies and Cake Pop Eye Balls
(red velvet cake inside for bloody effect-YUM!)
"Potions" and snacks table
The voting table for witch's brew,
candy corn count & to grab a glow stick!


Bathroom decor: Bath & Body Works soap, lotion
& candle, Kohl's towels, Target rug, Joann black letters

My dollar store glasses with vinyl using 
Cricut Happy Hauntings fonts welded on my Gypsy!

The vamp drinking "blood" (so meant to get a photo of us
together with our glasses - oops!) . Then the vamp was
about to take a bite out of our oldest ghoul prom queen
who ended up getting voted best costume by her ghoulfriends!

The voting of costumes and guessing of
candy corn and witch's brew ingredients
(yes, our brew was "brewing" thanks to dry ice!)

Younger daughter ghoul and her classmates about
to go on the scavenger hunt with the vamp

Older daughter ghoul and her classmates about to go 
on the scavenger hunt with "The Witch" (that's ME!)

The older ghouls on the "hunt" - I think this may be
the last year for the scavenger hunt. The older ones
just weren't as into it as the previous year.

The apple bobbing!

The Dance Party!
It was a big hit with the strobe light & other fun lighting!

Prizes for the costumes with buttons to wear -
Bath & Body Works Halloween lotion, lip gloss, shaped
anti-bac, pencil,Target $1 sticky notepad and candy

prizes for guessing the candy corn & witches brew
(contents same as costume prizes)

The treat bag filled with a Bath & Body Works hand sanitizer
($0.37 each 4 days before the party!), candy & a pencil 


Overall, this was a successful bash for this witch. I am entering the fun details of my party into Decorate to Celebrate's Halloween Party Challenge and Patches of Pink's Link Up Party!

(Insert my witch cackle here)

Happy spooky crafting everyone! Have a fabulous weekend!