Is anyone out there? I know- I've been gone for months! I have been crafting still though, and also got a smart phone finally! So this is my 1st mobile post. Maybe just maybe I can post more often now this way given that I take pics right on my phone of my projects.
So my BFF turned 40 last Saturday so I made her a card, a card that rocks! I used the new technology, Talking Tags! You use that app on your Smart phone to scan the bar code (labels sold online), record a message, then affix the bar code to your crafty project. When the recipient receives it, he or she downloads the Talking Tags app, scans the bar code, and gets to hear your message! So cool! And since my BFF lives many states away, this was a good alternative to being there in person. I also played the Beatles' "You Say It's Your Birthday" from YouTube so that the song could be a part of the 1-minute message. FUN!
Well that's all for this post. This was pretty easy on my phone so hopefully I'll be back with more posts soon! Happy 2013!
Showing posts with label Scrappy Moms. Show all posts
Wednesday, January 16, 2013
Friday, April 27, 2012
Dinosaur Train 2nd Birthday Party!
A few weeks back I went to my twin cousins' 2nd birthday party! I offered to help out with the decorations, which led me to get to know the boys' favorite TV show on PBS, Dinosaur Train! It really is an adorable show. And even though I initially suggested Elmo as the theme, I'm glad I was able to branch out into some other characters and personalize the party for my cousins.
Here's what I made:
Here's what I made:
Personalized party hats for the birthday boys!
I actually altered 2 party hats that were
in my party supply stash. They were a bit
girly before, but now they are fit for boys!
I got the Dinosaur Train graphics
online and printed them out.
The #2s were made with the Cricut Elmo's Party
cartridge and were glittered up with Stickles!
More Stickles on the names (also in Elmo font) . . .
And the letters were placed on foam tape for dimension.
And these were the banners I made!
Again, I used the Elmo font for the lettering,
but I ran the top layer through the Cuttlebug with the
Tiny Mosaic CB embossing folder for a dinosaur skin look!
The ribbons were all different between each of
the letters, but stayed with the color theme.
And again, I printed Dinosaur Train
graphics from the internet.
For added fun, I adhered a photo
of each boy to a letter of their banner.
Eliot is peeking through!
I had some more photo fun when making
these small little kid favors. I edited the twins
into a Dinosaur Train graphic! Everyone got
a kick out of these tags. They were attached
to a bottle of bubbles purchased at our local
dollar store 3 for $1. Simple and cheap!
Just some good ole' curling ribbon to attach the tags!
As part of my gift to the boys, I found these awesome
personalized T-shirt transfers from a store on Etsy!
The store is called customtshirtdesigns, but for some
reason I can't find any items for sale right now for them.
Maybe they're not making them anymore? Gasp!
But aren't the boys so cute in them?
They say, "Look who's 2" and then their
names are on the bottom of the 2. So perfect!
And of course I had to make matching cards!
I went with the design of the tshirt transfer, but with
the color and embossing from the banners.
The letters for the cards were cut using
the Cricut Birthday Bash cartridge. That is
definitely a favorite Cricut font of mine.
I use it A LOT.
I would have preferred to weld the card together
instead of adhering the tops of the numbers together,
but my Gypsy had to be replaced by Provo Craft (grrr)
and I hadn't used the Cricut Craft Room yet.
Some day I will dabble in it.
And yes, the sentiment stamp on the inside
is a Scrappy Moms stamp! It's from the
Simple Sentiments set. Love my SMS!
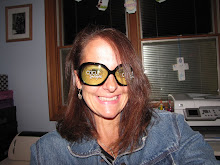
Don't the twins look adorable in the hats?
Ok, it took some major work to get this photo since they
didn't enjoy wearing the hats, but it was worth it!
They had a great birthday party!
Thanks for stopping by! I think that's it for party posts for me for a while. Hopefully I can get my Easter card up before the end of the month (yikes!). Have a great weekend all!
Tuesday, April 24, 2012
An Absolutely FAB-ulous Manicure Birthday Party!
HI! Remember me?? So sorry I've been away for so long my fellow crafters. I have been crafting, but life has been a bit crazy lately so I haven't had the time for posting. Hopefully the summer will get better for me to get back into the swing of things. Until then, my posts may be scattered. Please bear with me! :)
I've had a few birthday parties lately that I've been crafting for. The most recent was my younger daughter's manicure birthday party.
Here are some photos from it:
I've had a few birthday parties lately that I've been crafting for. The most recent was my younger daughter's manicure birthday party.
Here are some photos from it:
The 3D Nail Polish Invitations!
I got this idea from the following :
The party info side
I used the Cricut Forever Young cartridge for the
nail polish bottle and Quarter Note cartridge
for the lettering throughout the party.
The 3D invite in action!
That's a Q-tip for the polish applicator!
These cupcakes were made by my work friend's mom.
They truly were absolutely FAB-ulous!!
I didn't have any left after the party!
I made cupcake toppers for all of the
DE-lish cupcakes to match the party theme.
The stamp is from Scrappy Moms'
"Sweet Somethings" stamp set.
The sparkles on the cupcakes happen to match
the sparkles on the nail polish bottle top! LOVED that!
The birthday girl requested a banner from me after seeing
the ones I made for my 2-year old twin cousins recently.
I will post those party details hopefully soon!
I used the Cricut Black & White Imagine cartridge
to make all of the zebra-patterns for this party.
Worked out really well!
I hung 3 nail polish bottles from the banner.
I thought these could easily be removed when
the banner becomes a permanent fixture in
my daughter's room if she so desires.
Had to add in the absolutely Fab-ulous stamp
again from Scrappy Moms!
Ahh, the favors. I spent the most time on these little babies.
I used the Forever Young cartridge again for the purses.
And as recommended by a crafty co-worker,
I used velcro as closures on the purses- worked great!
All 13 purses!
Each purse was personalized with a tag
thanking each guest for coming. Also,
the guest's initial was on the back of the purse.
The contents of the favor purse: nail polish (of course!),
a mini nail file, a Bath & Body Works Pocketbac
(hand sanitizer), a Charms Blow Pop,
and a few pieces of Bazooka bubble gum.
I used to love the comic that came with each Bazooka
piece when I was a kid, and now my girls love them!
Here's a close-up of the bling! I used gun metal & magenta
Stickles, but then I ended up adding the stick-on gems later.
It needed more BLING!! I added a mini glue dot
behind to make sure they stuck to the glitter glue.
Here's a view of the initial side of the purses.
Here is my daughter opening presents while her guests
enjoyed the cupcakes at the fabulous little nail place near us,
There's the birthday girl with her banner behind her!
Here are the spoiled pre-teens getting pampered!
Cosmos was decorated so nice for the upcoming Summer season.
And here's the gang showing off their
freshly manicured nails!
This is one side of my postcard-style thank you note.
Here is the other side of the thank you.
I had a photo with the birthday girl and the guest,
and then the girl getting her nails done.
And then I did a simple nail polish bottle as embellishment.
Thank-yous - DONE!
Thanks for popping by! Happy crafting all!!
Saturday, March 31, 2012
Personalized Candy Bouquet Using Scrappy Moms' Spring Fair!
Wow! The last day of March is already here! I'm sad to see my month as the Scrappy Moms guest designer end. It was so much fun! I will be drawing a winner for my giveaway tomorrow 4/1, so if you have not got in it, click HERE!
To end my guest designer spot, I have one more project using Scrappy Moms' latest stamp set, Spring Fling - a candy bouquet!
Supplies:
To end my guest designer spot, I have one more project using Scrappy Moms' latest stamp set, Spring Fling - a candy bouquet!
This was made for my oldest daughter's BFF.
She just had a bedroom makeover so her name and
dots on the bucket match her new room colors!
She loves Bath & Body Works,
so we got her a gift card there.
I personalized the gift card with the help of my PC
and made it the focal point of the candy bouquet.
I added candies with a bubble gum or a
cotton candy theme (or both) to match the
gift card, and as a fun way to utilize the new
Scrappy Moms Spring Fair stamps!
Pixy Stix were added to the lollipop sticks
in case this girl didn't get enough of a
sugar rush from the other candies - LOL!
Another Spring Fair sentiment!
And another!
I used vinyl and my Cricut to personalize the bucket.
The back had more polka dots in the
gift recipient's bedroom colors.
Supplies:
- Cricut Car Decals cartridge font for name
- Cricut Art Philosophy for circles
- Vinyl in lime green, navy blue, sky blue and light purple from expressionsvinyl.com
- Pail from Michael's
- White shred from our local dollar store
- Wilton lollipop sticks from Michael's
- Styrofoam inserts from the local dollar store to hold sticks
- Candies: Pixy Stix, Pop Rocks, Blow Pop and Bubble Yum gum
- Bath & Body Works gift card
- Bubble Yum lip balm purchased from Michael's($1)
- PC to make hot pink square and Happy Birthday Ellie! greeting (Sorry- I can't remember the font! I spent a lot of time trying to match the Bath & Body Works logo, though! :))
- Scrappy Moms' Spring Fair stamp set
- Scrappy Moms' Hooray for Birthdays stamp set
- Stampin' Up Basic Black ink
- White cardstock from scraps cut into flags
I have more to share from this birthday party- a chocolate-themed one! I helped the mom make favors and I also redesigned the pinwheel centerpiece that I made earlier this month (shown HERE) to match the later-chosen colors of the party. I will post that as well.
Thanks for poppin' by!
Subscribe to:
Posts (Atom)