Saturday, March 31, 2012

Personalized Candy Bouquet Using Scrappy Moms' Spring Fair!

Wow! The last day of March is already here! I'm sad to see my month as the Scrappy Moms guest designer end. It was so much fun! I will be drawing a winner for my giveaway tomorrow 4/1, so if you have not got in it, click HERE!

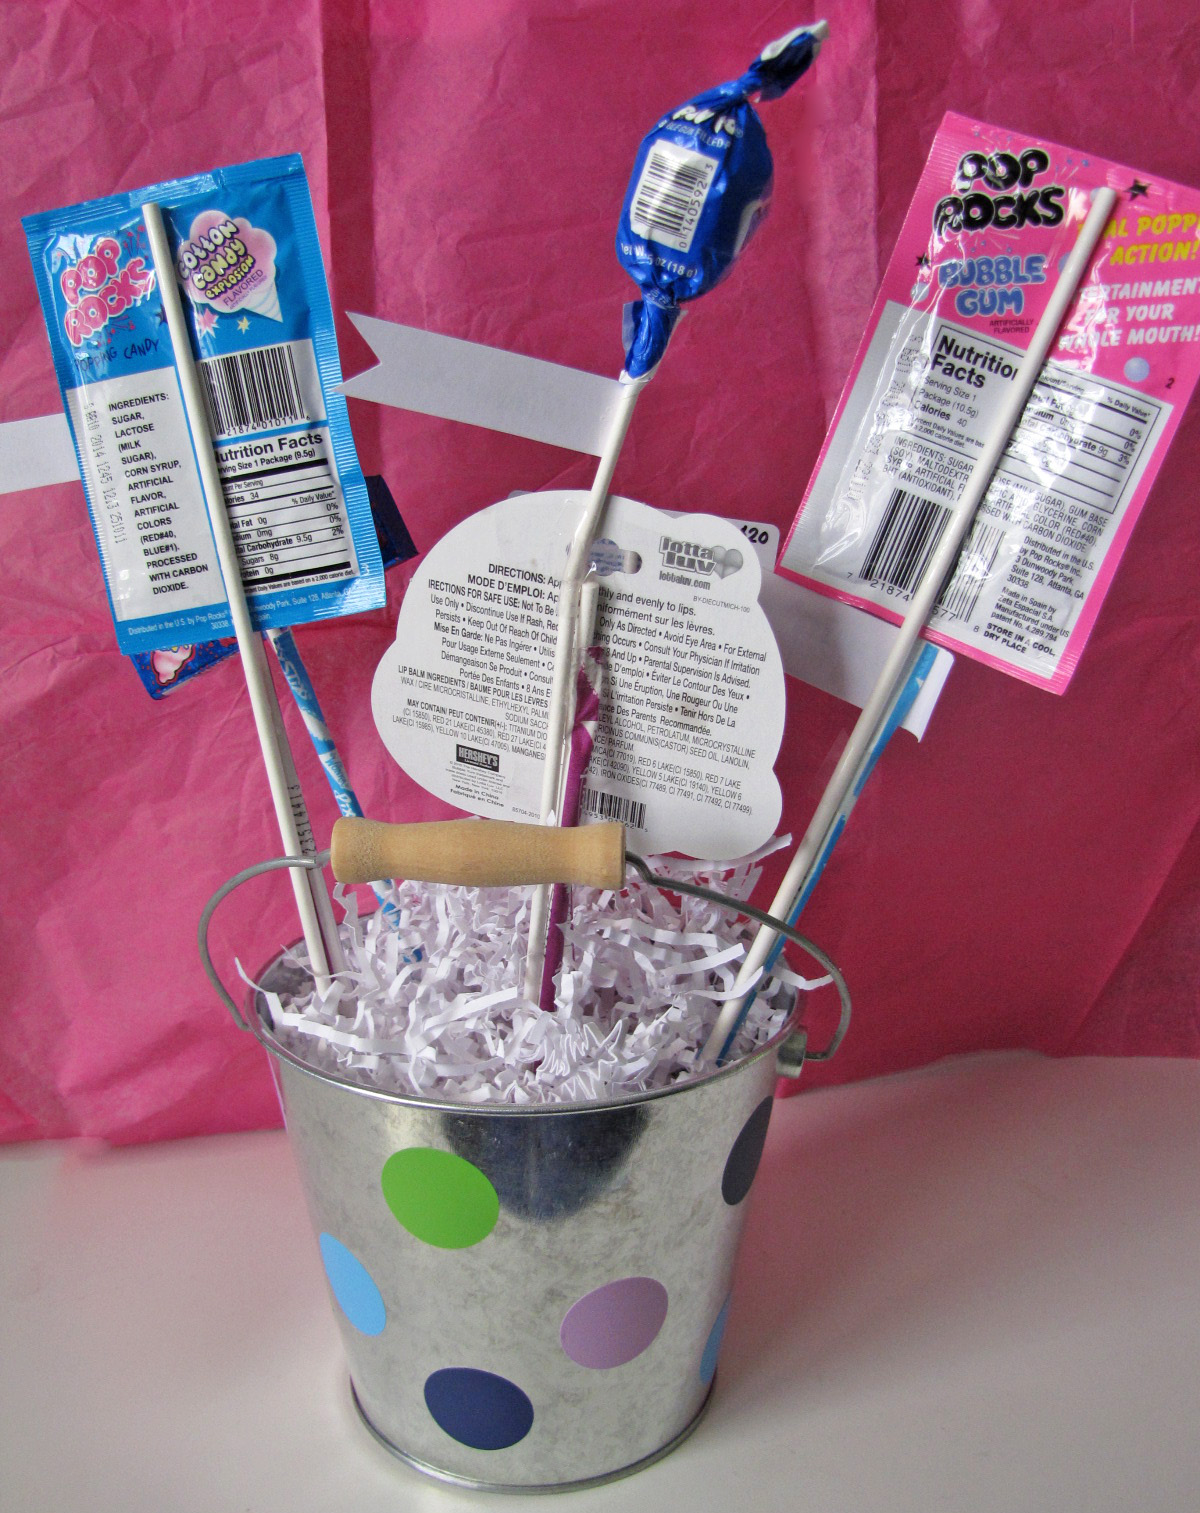
To end my guest designer spot, I have one more project using Scrappy Moms' latest stamp set, Spring Fling - a candy bouquet!

This was made for my oldest daughter's BFF.
She just had a bedroom makeover so her name and
dots on the bucket match her new room colors!

She loves Bath & Body Works,
so we got her a gift card there.

I personalized the gift card with the help of my PC
and made it the focal point of the candy bouquet.

I added candies with a bubble gum or a
cotton candy theme (or both) to match the
gift card, and as a fun way to utilize the new
Scrappy Moms Spring Fair stamps!

Pixy Stix were added to the lollipop sticks
in case this girl didn't get enough of a
sugar rush from the other candies - LOL!

Another Spring Fair sentiment!

And another!

I used vinyl and my Cricut to personalize the bucket.

The back had more polka dots in the
 gift recipient's bedroom colors.


Supplies:
  • Cricut Car Decals cartridge font for name
  • Cricut Art Philosophy for circles
  • Vinyl in lime green, navy blue, sky blue and light purple from expressionsvinyl.com
  • Pail from Michael's
  • White shred from our local dollar store
  • Wilton lollipop sticks from Michael's
  • Styrofoam inserts from the local dollar store to hold sticks
  • Candies: Pixy Stix, Pop Rocks, Blow Pop and Bubble Yum gum 
  • Bath & Body Works gift card
  • Bubble Yum lip balm purchased from Michael's($1)
  • PC to make hot pink square and Happy Birthday Ellie! greeting (Sorry- I can't remember the font! I spent a lot of time trying to match the Bath & Body Works logo, though! :))
  • Scrappy Moms' Spring Fair stamp set
  • Scrappy Moms' Hooray for Birthdays stamp set
  • Stampin' Up Basic Black ink
  • White cardstock from scraps cut into flags
I have more to share from this birthday party- a chocolate-themed one! I helped the mom make favors and I also redesigned the pinwheel centerpiece that I made earlier this month (shown HERE) to match the later-chosen colors of the party. I will post that as well.
 
Thanks for poppin' by!
 

Thursday, March 29, 2012

"March Madness" Part II - The Scrapbooks!

Thought I'd better get my March madness posts in before it's not March anymore! Yikes, time is flying by!

Now don't fall over, but here is a scrapbooking related post! I do scrapbooking, but usually it is for other people. Here is an example of me scrapbooking for other people!

I made scrapbooks for all 10 girls on my oldest daughter's basketball team. What I mean by making them is that I literally assembled them using my untouched YourStory binding machine. I got the binding machine using my Cricut rewards points some time ago. It worked out well.

Originally I was going to have the 7th graders make the 8th grader books in addition to their own at the scrapbooking party I hosted, but the girls were having too much fun with their own books so time ran away. I made the 8th grader books and the 7th graders presented them to the girls at their special luncheon that was held at school the day before the State tournament.

Here they are (excuse the girly bedspread background!):


 The 7th grade scrapbooking party!

Supplies:
  • YourStory binding machine
  • YourStory 11x8.5 white "linen-like" book covers ($5 each from cricutmachine.com)
  • Cricut Birthday Bash cartridge for letters
  • Cricut Sports Mania for basketballs
  • Georgia-Pacific white cardstock from Wal-mart for pages
  • Blue glitter cardstock from Michaels' sold by the sheet
  • Basketball material sheets sold by the sheet at either JoAnn or Michael's
  • Recollections black cardstock for basketball shadows
  • Gold and blue gems from Michael's dollar section
Using the same materials, I made all of the covers a little bit different. I placed photos inside the pages, but did nothing else so that the girls could personalize them starting the weekend of the big State tournament. I gave them each blue sparkle pens so that they could journal and sign each other's books. The 8th graders wrote "advice" for handling the coach the next basketball season - LOL!

I did have issues with pages from a couple of the books coming out, so I added some more hot glue to the inside spine and rebound them. I think the books are holding up okay. If not, people know where to find me and my binding machine! I think I might have had too many pages in them (15 total), and the weight of the paper (110 lb) has a lot to do with it. Trial and error!
 
All in all, these books were a huge hit! I even made books for the coaches and gave them at the Winter Sports Banquet the week after State. This was definitely an awesome bball season worthy of celebrating and documenting!
 
Thanks for stopping by! Happy crafting!

Saturday, March 24, 2012

Just the First Day of a 365-day Trip Around the Sun . . .

Happy Weekend all!!

This is the start of Spring Break for me and my girls - Woohoo!! I won't have the whole week off, but most of it (I was too scared of my workload to take the whole week off - sad, I know). Wish we had this past week's weather forecasted for it, but time off is TIME OFF, right?

Ok, onto the craftiness at hand. I may be stretching a bit here with this concept, but I went ahead with it anyway. Does that happen to you? Do you get a crafty idea in your head and you just won't let it go? Here is mine:

It's a pinwheel turned sun!

The sentiment says,
" A birthday is just the first day
of a 365-day trip around the sun  . . ."

(should have been journey instead of trip-Oops!)

A close-up of my multi-patterned sun
adorned with a baker's twine center!

"Enjoy your ride!" from Scrappy Moms'
NEWEST stamp set, Spring Fair!


And my "Sun" was EASILY made using
Scrappy Moms' first metal die - the Pinwheel die!

Supplies:
  • Cricut Imagine Hopscotch cartridge for the 2 pinwheel patterns and background pattern
  • Scrappy Moms' Pinwheel die for my "sun"
  • Recollections brown cardstock
  • Colorbok white textured 12x12 paper for printing patterns
  • Georgia-Pacific white cardstock for PC-printed front sentiment and inside layer
  • Lemon Drop baker's twine purchased from Scrappy Moms
  • Glue dot on pinwheel center to adhere baker's twine
  • Pop dot to adhere pinwheel onto card
  • Stampin' Up Chocolate Chip ink sponged onto patterned paper edges and front sentiment
  • Janis PC font for front sentiment
  • Stampin' Up ticket corner punch

I'll be back soon with more projects during my vacation. I still have a couple of "March Madness" projects from my daughter's State basketball tournament HOOPla to post!

Have a FABULOUS weekend!!

Thursday, March 22, 2012

Scrappy Moms' Sneak Peek # 4 - Elmo says he loves Scrappy Moms Pinwheel Die!!

Hi everyone! I am back with another sneak peek of Scrappy Moms' latest releases, the Pinwheel die and the Spring Fair stamp set!

My twin boy cousins (not 1st cousins) turn 2 next month. My girls and I LOVE to take care of these adorable toddlers any chance we get! Because of this, we happen to know the boys love Elmo! Of course it's hard not to like that fuzzy red guy who talks about himself in the third person - LOL!

Anyway, I'm still waiting to hear what the theme of the party will be, which is why I refrained from making 2 cards at this point (I love to match the theme!), but here is the Elmo card I did make:

Elmo holding a Scrappy Moms pinwheel!
The color seems off in the photo,
but in person, Elmo's redness is very vibrant!

A close-up of the awesome Scrappy Moms pinwheel!

The inside with a new SM sentiment from Spring Fair!


Supplies:
  • Cricut Elmo's Party Cricut cartridge for Elmo and # 2
  • Scrappy Moms Pinwheel Die
  • Red, yellow, orange, white and black cardstock scraps from my stash
  • Black Stampin' Up brad
  • McDonald's straw taken from my glove compartment and then cut (I always keep spares when they forget to give me a straw in the drive-thru when I order my $1 large Diet Coke!)
  • "Whirl away the day!" from Scrappy Moms' Spring Fair stamp set
  • "2012" numbers from Scrappy Moms' awesome newer birthday stamp set, Hooray for Birthdays!
  • Basic Black Stampin' Up ink
  • Fiskar's corkscrew decorative edge scissors
So that's it for the Elmo birthday card. I know it's basic, but it's for a 2-year old, right? And by being simple, it gives center stage to the fun pinwheel. :)

I'll be back with another card showcasing Scrappy Moms' latest products over the weekend. If you have not joined in on the "Whole Lotta Shakin' Goin' On" (use a wobble) challenge going on over at Scrappy Moms, you have until Monday, 3/26! Click HERE! And lastly, if you have not entered my giveaway for an awesome Scrappy Moms stamp set, click HERE!
Happy almost Friday!!!

Tuesday, March 20, 2012

Scrappy Moms' TTC - You MOO-VE me!

Happy Tuesday, everyone! And not just ANY Tuesday - a Scrappy Moms' Terrific Tuesday Challenge Tuesday!!!
The challenge this week is to use an action wobble on your project. Here is my project:

Yep, my brown cow is a wobblin'!
Did you know that Scrappy Moms
now carries Action Wobbles in  their
ever-growing list of products? They DO!


I used the "You MOO-ve me!" sentiment
on my wobblin' cow card from
Scrappy Moms' newest stamp set, Spring Fair:

Back view with my SM "Created by" stamp!
See my cow wobble here:


Supplies:
  • Cricut Birthday Bash cartridge for the cow
  • Cricut Doodlecharms cartridge for the sun
  • "You MOO-ve me!" sentiment from Scrappy Moms' NEW Spring Fair stamp set
  • "Created by" stamp from Scrappy Moms' Everyday Greetings stamp set
  • Stampin' Up Basic Black ink
  • Brown, ivory, tan, yellow, green and white cardstock scraps from my stash
  • White Georgia-Pacific cardstock
  • EK Success foam dots for sun
  • Provo Craft edge scissors to make grass
I am entering this wobbly cow card into the very first Wobble Wednesday Challenge - Anything Goes!

Be sure to visit the Scrappy Moms blog to check out the design team's projects for this TTC! Then jump into the challenge yourself! :)

And if you haven't done so already, enter my Scrappy Moms stamp set giveaway HERE! Have a TERRIFIC Tuesday!

Sunday, March 18, 2012

2nd Scrappy Moms Sneak Peek - Pinwheel Centerpiece!

Hello, everyone! I hope you're enjoying a beautiful Sunday like I am! I'm digging this amazing weather!

Speaking of amazing, Scrappy Moms not only released a fun new stamp set this weekend, they released their very first metal die- A PINWHEEL!!!


My friend is throwing a chocolate-themed birthday party for her daughter in a couple of weeks, so I made this centerpiece using the awesome new Pinwheel Die:

The whole centerpiece!

A close-up of the center pinwheel with a sentiment flag
that has "Whirl away the day!" stamped on it
from Scrappy Moms' newest stamp set, Spring Fair!

A closeup of the left pinwheel with the SMS Spring Fair
sentiment, "When I'm down you turn me Around"

And then the right pinwheel with "You Blow me away!"
also from Scrappy Moms' Spring Fair

Here is a photo of the complete Spring Fair! stamp set:


Supplies:
  • Scrappy Moms' BRAND NEW Pinwheel die
  • All sentiments from Scrappy Mom's NEW stamp set, Spring Fair!
  • Cricut Imagine Yummy cartridge for patterned paper
  • Stampin' Up silver diamond-shaped brads for pinwheels
  • Stampin' Up Pretty In Pink cardstock for flags (cut with trimmer and scissors)
  • Stampin' Up Chocolate Chip ink
  • Wilton lollipop sticks (purchased at JoAnn)
  • Glue Dots brand craft dots to adhere pinwheels to lollipop sticks
  • Ashland vase purchased from Michael's
  • Hershey Kisses - Spring edition
  • Pink organza ribbon to wrap around vase
The pinwheel die is SO easy to use! It can be used with your Sizzix, Spellbinder or Cuttlebug die-cutting machine. I used my Cuttlebug! If you want to see how to use the die with Cuttlebug, Scrappy Moms design team member Sarah from Live Love and SCRAP! posted a fabulous video on it along with showing her awesome SM Pinwheel project! Check it out!

I will be back with more SM projects soon. And if you haven't entered my drawing for the Scrappy Moms' Mini Messages stamp set that I'm giving away, click HERE!

Thanks for stopping by! Have a great week!!!!!

Friday, March 16, 2012

Scrappy Moms Sneak Peek # 1 and GIVEAWAY!!!

It's here! IT'S HERE! My guest design spot for Scrappy Moms!! Today they are releasing 2 fabulous products!

If you've been following me for a while or if you notice the label that I have the most posts for, then you can pretty easily figure out that I love Scrappy Moms stamps! This is totally on my crafting bucket list - to be a designer for a product I really love! :)

I have immense respect for two moms, them being Melanie and Tammy, starting a business like this. And the stamps? They are AWESOME! They have great sentiments, fun themes, adorable and varied fonts, reasonable prices, and you get a lot of stamps in a set. Do you get that I like these stamps???

So without further adieu, here is their newest stamp set, Spring Fair!


The first stamp that jumped out at me was the "You're sweeter than Cotton Candy," so I created this card with it:

My daughters love this card!
They both had cravings for cotton candy
after they saw it. Gotta love THAT!

I placed a pocket on the inside to hold a gift card.

My youngest wants me to save this card
for her birthday next month and fill it with
iTunes gift cards. We'll see. I have to decide
if she really is sweeter than cotton candy! :)

One of my favorite SM stamps, "Sweet Birthday Wishes"
was used for an inside greeting.

Can you see the fluffiness of the cotton candy? Yum!

The back is also stamped with a Scrappy Moms stamp,
"Created By." Nice finishing touch! 

Supplies:
  • "You're sweeter than Cotton Candy" sentiment from Scrappy Moms' NEWEST stamp set, Spring Fair!
  • "Sweet Birthday Wishes" sentiment from Scrappy Moms' Oldie but goodie, "Sweet Somethings" stamp set
  • "Created by" stamp from Scrappy Moms' Everyday Greetings stamp set
  • Cotton ball inked with Stampin' Up Pretty in Pink to make cotton candy
  • Stampin' Up Pink Passion ink
  • Cricut Imagine Bugglegum Stripes cartridge for pink striped patterned paper
  • White Colorbok textured cardstock
  • Blossom baker's twine purchased from Scrappy Moms
  • Creative Memories corner rounder punch
  • Terrifically Tacky red tape to adhere my patterned paper in a roll to hold the cotton candy
  • Recollections foam dots to pop up the white mat
 I think that about covers it for supplies. So there's my first project as guest designer for Scrappy Moms! I will have more to show you over the next week, including a project done with their 2nd product released this month, so please come by again! I love visits, comments, and new followers (hint, hint). :)

Speaking of wanting bloggy love in the form of comments and new followers, I am doing a GIVEAWAY in honor of my guest designer spot on Scrappy Moms. Hmmm . . . what should I giveaway?? A Scrappy Moms stamp set of course!

I am giving away:


I don't have this versatile set yet, but I will soon! I'm ordering one for you and one for me!

All you have to do is:
  • Be a follower of my blog
  • Leave a comment for me on this post
Extra credit: Advertise for me on your blog, come back and leave me a comment that you've done this, and you will get another chance to win! Gotta love extra credit. Saved me many a time . . .

I will be drawing a winner at the end of my guest designing term (Sniff, sniff) at the end of the month. 

Thanks for stopping by! Now click on one of the many links to Scrappy Moms I have on this post and check out what the design team made! And of course pick up a new stamp set or 2 or 10 including the new Spring Fair!


Wednesday, March 14, 2012

March Madness (Part 1)!!

IT'S MARCH MADNESS TIME, BABY!!!

Yeah, I'm not usually that excited about basketball. But THIS year, my daughter's 7th/8th grade team made it to March by being selected to participate in the State tournament!! It was AWESOME!!! So as promised, here is the first project I'd like to share from it.

Of course I made stuff for the girls, but this was the ultimate time for us MOMS to show off our daughters! So, I made each of the moms a pin to wear!!

Here they are:
The moms of all 10 players got a pin!

Here are the 8th grader pins
complete with name, number, and photo!

And here are the 7th grader pins!
I have quite a fondness for # 35 . . . :)

A little side close-up view of them! Rosettes are all the rage
now, so I thought they would be perfect for the mom pins!

Supplies:
  • Cricut Imagine Bubblegum Stripes cartridge to print paper for Rosettes
  • Cricut Art Philosophy cartridge for the white scallop backing the photos
  • Cricut Sports Mania cartridge for mini basketballs
  • Cricut Birthday Bash cartridge for letters and numbers
  • Photos of each girl then punched out with a 1 1/2 inch circle punch
  • Textured basketball paper for mini basketballs (purchased at JoAnn by the sheet)
  • Recollections Black cardstock for basketball shadow
  • Recollections blue paper to mat a couple of the girls that had white backgrounds
  • White Georgia-Pacific cardstock for scallops
  • Blue Darice self-stick holographic paper for letters and numbers (purchased at JoAnn by the sheet)
  • White satin ribbon
  • Blue glitter ribbon purchased from Michael's
  • Hot glue gun and glue sticks to adhere the rosette
  • Glue dots for basketball
  • Foam dots for behind the photos for added dimension
  • Adhesive-backed pins purchased from Michael's Jewelry section
Don't they remind you of blue ribbons you would win at the fair? They did for me, but I didn't see a way around it given that the school colors are blue and white. I got rave reviews from the moms and many others, so that made me happy.
 
I did learn a lot from making these pins. It's quite different to make a paper craft that will be worn for a few days at a time. By day 2, I packed an "emergency repair kit" that included glue dots, scissors, extra pins, extra letters and numbers. Unfortunately moms were starting to lose letters or numbers, the white satin ribbon was fraying on the sides, a pin's clasp broke, etc.- Yikes!! Repairing kept me busy while waiting for our pizza after game 3's win. It takes a while when a whole team with parents and siblings order yummy deep dish!
 
One last thing: I decorated my frame in my office for the big State event, which also holds my pin for now:
 
 
I put chalkboard vinyl from Expressions Vinyl on the frame's backing and used a white Pentel Wet Erase chalk marker to write. The die cut eagle was on the wall at our school's bball tournament back in January, which I took several of when we cleaned up! I couldn't let all of those eagles just go in the trash! The younger grades had decorated them so beautifully after all! :)
 
I will be back with another State project soon. I also have a very big Scrappy Moms weekend coming up- WOOHOO!! Have a great remainder to your week!!