Friday, March 16, 2012

Scrappy Moms Sneak Peek # 1 and GIVEAWAY!!!

It's here! IT'S HERE! My guest design spot for Scrappy Moms!! Today they are releasing 2 fabulous products!

If you've been following me for a while or if you notice the label that I have the most posts for, then you can pretty easily figure out that I love Scrappy Moms stamps! This is totally on my crafting bucket list - to be a designer for a product I really love! :)

I have immense respect for two moms, them being Melanie and Tammy, starting a business like this. And the stamps? They are AWESOME! They have great sentiments, fun themes, adorable and varied fonts, reasonable prices, and you get a lot of stamps in a set. Do you get that I like these stamps???

So without further adieu, here is their newest stamp set, Spring Fair!


The first stamp that jumped out at me was the "You're sweeter than Cotton Candy," so I created this card with it:

My daughters love this card!
They both had cravings for cotton candy
after they saw it. Gotta love THAT!

I placed a pocket on the inside to hold a gift card.

My youngest wants me to save this card
for her birthday next month and fill it with
iTunes gift cards. We'll see. I have to decide
if she really is sweeter than cotton candy! :)

One of my favorite SM stamps, "Sweet Birthday Wishes"
was used for an inside greeting.

Can you see the fluffiness of the cotton candy? Yum!

The back is also stamped with a Scrappy Moms stamp,
"Created By." Nice finishing touch! 

Supplies:
  • "You're sweeter than Cotton Candy" sentiment from Scrappy Moms' NEWEST stamp set, Spring Fair!
  • "Sweet Birthday Wishes" sentiment from Scrappy Moms' Oldie but goodie, "Sweet Somethings" stamp set
  • "Created by" stamp from Scrappy Moms' Everyday Greetings stamp set
  • Cotton ball inked with Stampin' Up Pretty in Pink to make cotton candy
  • Stampin' Up Pink Passion ink
  • Cricut Imagine Bugglegum Stripes cartridge for pink striped patterned paper
  • White Colorbok textured cardstock
  • Blossom baker's twine purchased from Scrappy Moms
  • Creative Memories corner rounder punch
  • Terrifically Tacky red tape to adhere my patterned paper in a roll to hold the cotton candy
  • Recollections foam dots to pop up the white mat
 I think that about covers it for supplies. So there's my first project as guest designer for Scrappy Moms! I will have more to show you over the next week, including a project done with their 2nd product released this month, so please come by again! I love visits, comments, and new followers (hint, hint). :)

Speaking of wanting bloggy love in the form of comments and new followers, I am doing a GIVEAWAY in honor of my guest designer spot on Scrappy Moms. Hmmm . . . what should I giveaway?? A Scrappy Moms stamp set of course!

I am giving away:


I don't have this versatile set yet, but I will soon! I'm ordering one for you and one for me!

All you have to do is:
  • Be a follower of my blog
  • Leave a comment for me on this post
Extra credit: Advertise for me on your blog, come back and leave me a comment that you've done this, and you will get another chance to win! Gotta love extra credit. Saved me many a time . . .

I will be drawing a winner at the end of my guest designing term (Sniff, sniff) at the end of the month. 

Thanks for stopping by! Now click on one of the many links to Scrappy Moms I have on this post and check out what the design team made! And of course pick up a new stamp set or 2 or 10 including the new Spring Fair!


Wednesday, March 14, 2012

March Madness (Part 1)!!

IT'S MARCH MADNESS TIME, BABY!!!

Yeah, I'm not usually that excited about basketball. But THIS year, my daughter's 7th/8th grade team made it to March by being selected to participate in the State tournament!! It was AWESOME!!! So as promised, here is the first project I'd like to share from it.

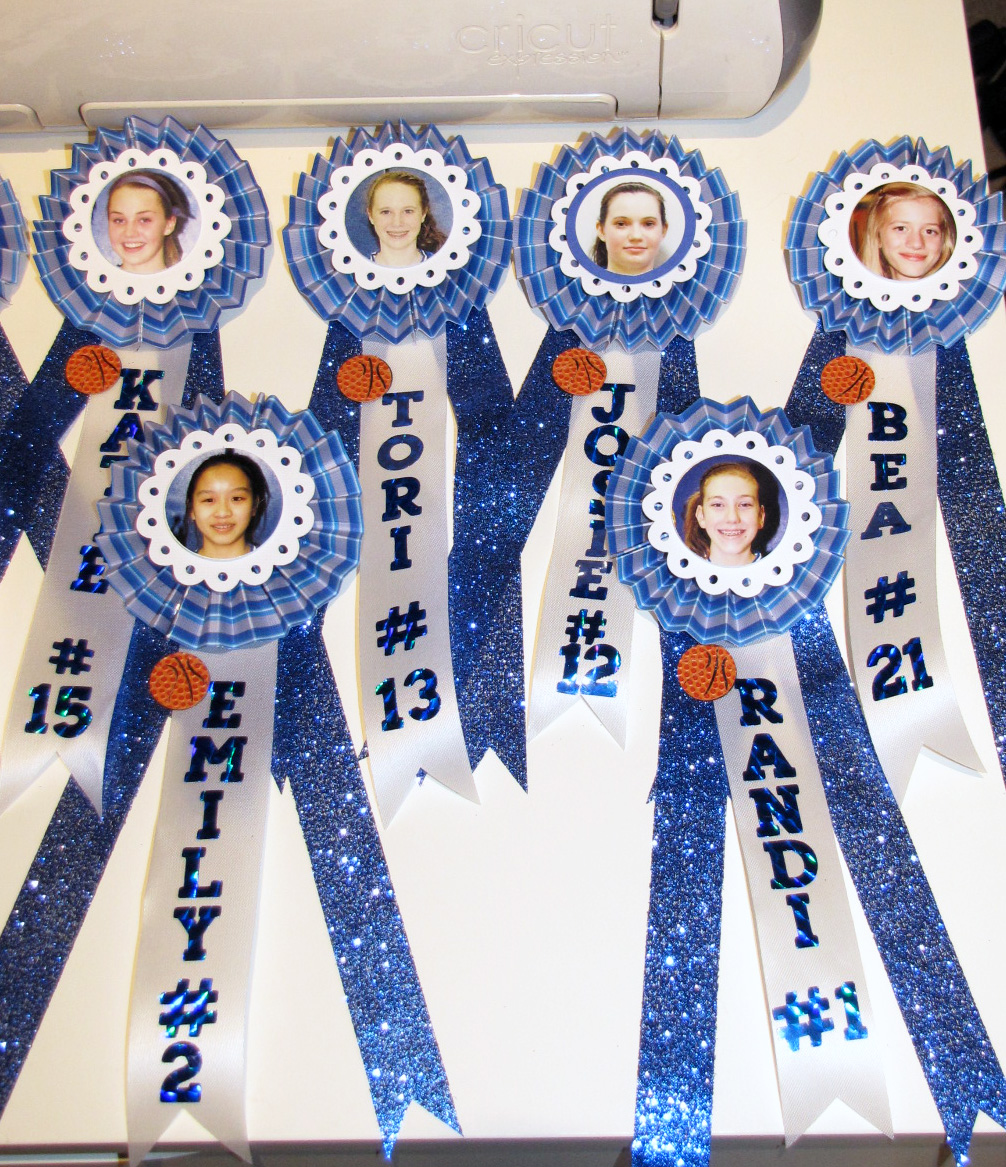
Of course I made stuff for the girls, but this was the ultimate time for us MOMS to show off our daughters! So, I made each of the moms a pin to wear!!

Here they are:
The moms of all 10 players got a pin!

Here are the 8th grader pins
complete with name, number, and photo!

And here are the 7th grader pins!
I have quite a fondness for # 35 . . . :)

A little side close-up view of them! Rosettes are all the rage
now, so I thought they would be perfect for the mom pins!

Supplies:
  • Cricut Imagine Bubblegum Stripes cartridge to print paper for Rosettes
  • Cricut Art Philosophy cartridge for the white scallop backing the photos
  • Cricut Sports Mania cartridge for mini basketballs
  • Cricut Birthday Bash cartridge for letters and numbers
  • Photos of each girl then punched out with a 1 1/2 inch circle punch
  • Textured basketball paper for mini basketballs (purchased at JoAnn by the sheet)
  • Recollections Black cardstock for basketball shadow
  • Recollections blue paper to mat a couple of the girls that had white backgrounds
  • White Georgia-Pacific cardstock for scallops
  • Blue Darice self-stick holographic paper for letters and numbers (purchased at JoAnn by the sheet)
  • White satin ribbon
  • Blue glitter ribbon purchased from Michael's
  • Hot glue gun and glue sticks to adhere the rosette
  • Glue dots for basketball
  • Foam dots for behind the photos for added dimension
  • Adhesive-backed pins purchased from Michael's Jewelry section
Don't they remind you of blue ribbons you would win at the fair? They did for me, but I didn't see a way around it given that the school colors are blue and white. I got rave reviews from the moms and many others, so that made me happy.
 
I did learn a lot from making these pins. It's quite different to make a paper craft that will be worn for a few days at a time. By day 2, I packed an "emergency repair kit" that included glue dots, scissors, extra pins, extra letters and numbers. Unfortunately moms were starting to lose letters or numbers, the white satin ribbon was fraying on the sides, a pin's clasp broke, etc.- Yikes!! Repairing kept me busy while waiting for our pizza after game 3's win. It takes a while when a whole team with parents and siblings order yummy deep dish!
 
One last thing: I decorated my frame in my office for the big State event, which also holds my pin for now:
 
 
I put chalkboard vinyl from Expressions Vinyl on the frame's backing and used a white Pentel Wet Erase chalk marker to write. The die cut eagle was on the wall at our school's bball tournament back in January, which I took several of when we cleaned up! I couldn't let all of those eagles just go in the trash! The younger grades had decorated them so beautifully after all! :)
 
I will be back with another State project soon. I also have a very big Scrappy Moms weekend coming up- WOOHOO!! Have a great remainder to your week!!

Sunday, March 11, 2012

Scrappy Moms' TTC Challenge - St. Patrick's Day!

Hi my fellow paper crafters! It's been waaaay too long since I've posted! I'm so sorry!! I have been crafting, just haven't had a moment to post. My daughter's basketball team made it into the state tournament which was last weekend, so I was super busy making all sorts of things to go along with that event. It was so much fun! The girls ended up winning the consolation bracket-YAY! I will post those "March Madness" projects very soon.

In the meantime, if you notice on my sidebar, I am Scrappy Moms' March guest designer!!! It seems like forever ago that I was selected for this distinguished honor and oh my goodness - it's HERE!!!! I will be posting some fun projects soon for that, but to kick off my March posts, I of course had to jump into the current Terrific Tuesday challenge over at Scrappy Moms. The challenge is St Patrick's Day! You can make any project relating to this fun Irish holiday.

I must give credit for this project to Paulette over at Around the Block with Scrapalette. She made an adorable St. Patrick's Day candy purse, which I just loved! So, I decided to make my own, but with a Scrappy Mom twist. :)

Here it is:
The purse!

Close-up of me pot 'o gold!


Supplies:
  • Cricut Art Philosophy cartridge for backing shape and mat (edited on my Gypsy)
  • Cricut Simply Charmed cartridge for pot of gold
  • Recollections green cardstock
  • Georgia-Pacific white cardstock
  • Clear party favor bags purchased from Wal-Mart
  • Gold coin candy purchased from Walgreens
  • "I TREASURE you!" sentiment from Scrappy Moms' Designers Choice stamp set
  • Mandarin, maraschino cherry and pea pod bakers twine purchased from Scrappy Moms
  • Terrifically Tacky tape to adhere bakers twine "rainbow"
  • Gold Stickles
  • White Offray craft ribbon for purse handle
Well that is it! Such a cute little purse! I made 2 of them so I will give them to my daughters next weekend for the big St. Patty's Day holiday.
I will be back soon with more projects AND keep a lookout for a giveaway!! Have a great weekend!

Monday, February 20, 2012

Eeyore finally packaged up!

Happy President's Day all!

I'm so happy that my company is closed for this holiday. I LOVE 3-day weekends! One day for obligations (mine was a bball tournament . .  shocker, huh?), one day to get the house in order (i.e. laundry duty), and one day to PLAY! It's the perfect weekend amount in my opinion. :)

And since I had this extra time, I was FINALLY able to get the Eeyore note cards I started last month made and packaged up! See the original post HERE. I've been feeling pretty bad that I haven't been able to finish them for my pastor, but now I can officially cross them off my things-to-do list and give them away!

While finishing theses cards up, I decided to change the placement of Eeyore and the baker's twine so that Eeyore is "anchored" on the card. Here is the card re-done:


I made custom envelopes using the
Cricut Don Juan cartridge to fit the 4" card.

Part of the reason why I didn't finish this project
was that I didn't know what to do about envelopes.
I couldn't find envelopes to purchase that would fit
these 4" cards well. So I opted to make the
envelopes, but they did take some time.

Here are all six note cards with their custom envelopes.

I used Lick & Stick envelope glue on the envelopes.
It may be hard to see, but it's the shiny stuff
where envelope glue should go. :)

I put the note cards with envelopes in a clear 8x10 bag
and wrapped the excess around the note cards.
Then I tied baker's twine around and added the tag.

Here's a close-up of the tag using a
Scrappy Mom's sentiment of course!

Supplies for envelopes and packaging:
  • Eeyore 4" note cards (see previous post HERE for note card supplies)
  • Cricut Don Juan cartridge for envelopes (9.82" width 4.29" height sized on my Gypsy; I hid the score marks using the hide contour feature- otherwise the marks are cut and make the envelope look not so nice!)
  • Clear 8x10 bag (received as packaging for a recent Etsy order, but they can be ordered from Etsy as well)
  • Green Sneakers Lick & Stick remoistenable envelope glue 
  • Charcoal baker's twine purchased from Scrappy Moms
  • "With Prayers & Positive Thoughts" sentiment from Scrappy Moms' Everyday Greetings stamp set
  • Georgia-Pacific white cardstock scrap for tag
Well, off to go shuffle a kid around from her friend's house to her bball practice. Have a great week my fellow crafters!

Tuesday, February 14, 2012

Valentines for my Valentines

Happy Valentine's Day everyone!! Well, not for long, but the spirit of love should live on throughout the year, right? :)

I made a couple of valentines for my sweet valentines, my girls, last night. I know - Eleventh hour, right? Story of my LIFE lately!!!

Anyway, I wanted to jump into My Pink Stamper's 10,000 Hits/Pinkalicious Blog Hop challenge, so I made the cards to fit the challenge - make a project using red, a circle, pink ribbon, two My Pink Stamper stamps, and a diecut.

This is what I came up with:

Front

Side

Inside

Back

Supplies:
  • Cricut Birthday Bash cartridge for scalloped circle card base cut at 4 " and mat circle cut at 3.75"
  • Cricut Gypsy Wanderings for heart cut at 2"
  • Colorbok textured 12x12 paper purchased at Walmart
  • Stampin' Up Pretty In Pink cardstock
  • Stampin' Up Real Red cardstock
  • Cuttlebug D'Vine Swirls embossing folder to emboss pink mat circle
  • Stampin' Up Pretty In Pink 7/8"organza ribbon (purchased several years ago)
  • "Love Always" and "Handmade with love by" sentiment stamps by My Pink Stamper 
  • Stampin' Up Real Red dye ink
Simple, right? I left a lot of room on the inside of the cards to write a special message to each girl. The cards matched well with the gift bags full of girly goodness I gave them tonight. My valentines were spoiled with lip glosses, lotions, mini purse mirrors, cozy Aeropostale slipper socks, Aeropostale necklaces plus LOTS of yummy chocolates.

The My Pink Stamper set I used on the card is extra special because I won it at Robyn's class at CHA in July 2010!!

Emma of My Creative Time took this pic - so cool!!
What a craft geek I am here - My Scrap Queen tee
from Michael's (pink of course!) and wearing my
Cricut Imagine bug sunglasses on my head-LOL!

It was so much fun to meet these crafty celebs in person. They were all so fun!

Well, I gotta hit the mattress ball as my awesome "Nawlins" friend would say. Have a good remainder to your week all!