Thursday, December 29, 2011

I'm Dreaming of A Vinyl Christmas!

Here are more of my Christmas projects I've done over the last couple of weeks. All of them involved vinyl in some way. Ya think I'm a little addicted???

This charger was for my friend. I totally CASE'd it
from a Cricut MB member named 5 Lil Monkeys'-
THANK YOU!!
Apparently she CASE'd it and added her own twist,
but she doesn't recall where she found it originally. 
No twist for me! I loved this design just as it is. And my
Gypsy and transfer tape made this a pretty easy project!


This was my first attempt at glass etching- a letter E using
the Gypsy Font digital cartridge that was preloaded on my Gypsy.
I haven't etched anything else to date, but I'm
guessing that a thicker glass will produce a better etching.
The ornament glass is super thin.

I wasn't especially fond of the Hallmark Godchild
ornament this year, so I thought I would go another route
for the 3 godkids that came into town this past Summer
and went to Legoland with me and my family.

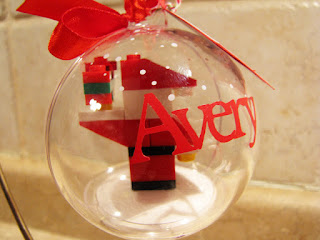
I purchased a set of 3 Lego Santa ornaments off of eBay.
I had my daughter assemble this Lego for the inside of the
ornament because this recipient is too young for Legos.
Also this ornament would act as a sample for the older 2 kids
to see what their ornament should look like
after they put their Lego together.

I personalized this ornament in red vinyl
with the Plantin Schoolbook cartridge.

Here is a view of the Santa Lego assembled.

Here are the 3 ornaments together ready to be put back
in the box- the fully assembled one for Avery and the other
2 for the kids that are old enough to put the Legos together.


I also added tags with a group photo from our
Summer Legoland adventure.


Bath & Body Works had cute mailboxes
with travel-sized holiday bath products in them.
I thought this was perfect for one of our young cousins.
And of course I had to personalize it!
I used the Cricut Alphalicious cartridge for her name.
Maybe she can use the mailbox to hold her valentines.

I also vinyled one of these mailboxes for my older daughter
as she admired it in the store earlier in the season.
The younger daughter got a Bath & Body works gift set
that had the bath products in a mini bath tub- so cute!
I vinyled her name on that, too, but didn't grab
a photo before she took apart the gift set. Oops!

I found these mini ornaments in the dollar section at Michael's.
My nephew plays both of these sports quite intently
so I thought this set was perfect for him.
And, yet again, I had to personalize with my
new favorite crafty medium - VINYL!
I used Plantin Schoolbook for the font cartridge.


Here is a little metal pail that I doctored with vinyl
for my adult niece. I added some Bath & Body Works
mini products-  just a little gift to let her know she is thought of.
The buckle was cut using the Cricut Art Philosophy cartridge
and the black "belt" was cut using a trimmer.I must say
that putting vinyl on something round like this was a bit tricky!


Ok, that's it for my Christmas projects. I really wanted to personalize all of my gift tags, but ran out of time. I felt really bad about it, but I think my family had a pretty good Christmas even without my personalized tags (sniff, sniff).

I am entering this post in Robin's Creative Cottage Link Up Party! Come join the linking fun! The party ends January 2nd, so pop by soon.
Thanks for stopping by! Have a very Happy New Year celebration all!!

Christmas Teacher Gifts

Hello again my crafty friends! I'm so sorry I haven't posted in a couple of weeks. I really don't know where those weeks went. They were so busy!! If I didn't have photographic evidence of my Christmas events, I would be in disbelief that the holiday actually came and went!!

So let me go back to December 15th and post my teacher gifts that we gave to my girls' homeroom middle school teachers. I literally assembled these gifts on the 15th to give on the 16th - GASP!! Yes, that's how my whole holiday season has gone. I was not ahead of the game for ANYTHING!!! It's usually like this for me, though, so I am very glad I get my Christmas cards mailed the day before Thanksgiving. It's crazy, but I honestly don't know when I would get to them if I didn't do them in November.

Okay, enough babble and onto the teacher gifts:

Here is a vinyl personalization of the teacher's last name
on a rectangular platter from Michael's - Loved these!
I got this idea from the Expressions Vinyl blog.


This was pictured when the Stickles were freshly applied.
AGAIN, I made all of this the night before - Ugh.

I used a mix of Scrappy Moms Christmas stamps for this tag.

I know the cookies look a bit skimpy on this platter,
but I didn't have a lot of cookies baked yet at this point
in the season. Also, I wanted the personalization to peek a bit.
And lastly, I contributed to the middle school teachers' gift
where this teacher was included, so this was just extra.
He is a fave of both of my girls. :)


This was a Cricut Birthday Cake Art cartridge
for the other homeroom teacher!

We gave her my daughter's Cricut Cake Mini
earlier this Fall as we upgraded to the big one.
(Of course ours is still in the box - insert heavy sigh here)


I used mirrored cardstock and the Cricut Accent Essentials
cartridge to mimic the snowflake on this Target foil paper
from the dollar section- such fun paper! 
I also popped the middle dot up with 2 dimensionals.


This is a new Scrappy Moms stamp from their
"A Holiday to Remember" set - Love it!

Supplies:
  • Cricut A Child's Year cartridge for green vinyl letters
  • Cricut Stone Script cartridge for red vinyl letters welded on my Gypsy
  • Cricut Simply Charmed cartridge for candy cane
  • Cricut Accent Essentials cartridge for snowflake
  • Expressions Vinyl outdoor vinyl in Red and Lime Tree Green
  • Lime green, red, white, and mirrored cardstock scraps from my stash
  • Scrappy Moms "A Holiday to Remember" and "Winter Wishes" stamp sets
  • Stampin' Up Basic Black ink
  • Stampin' Dimensionals on candy cane and snowflake (doubled up on snowflake)
  • Icicles and Christmas Red Stickles

Ok, that's about it for this post. I am entering it into Fantabulous Cricut's Challenge # 91 - Trimming with a Tag. Thank goodness they gave extra time on this one!!
Enjoy the last few days of 2011!!

Sunday, December 11, 2011

"Believe" Santa Bag in PINK!

I know- if you've been following me, you are about falling off your chair seeing a third post from me in the same day. What can I say? I'm on a roll!! First my teacher luncheon treats, then my vinyl-personalized ornament, and now a Christmas gift!

Here is my inspiration for today's project:


How about a little pink and black for the holidays? Actually, that color is not new for me. My girls' dresses and my Christmas card were in these colors last year. But I recently went to Chicago to eat breakfast in the World-Famous Walnut Room in Macy's (formerly known as Marshall Field's, which I miss). Then we went to see Santa two floors below. We do this every Christmas season, which is one of my favorite of our traditions.

Anyway, back to the inspiration. It appeared that they decorated The Great Tree in the Walnut Room the same as last year-GASP! Darn budget cuts! But for a little spice, they added several small trees along the bottom that were either decorated or inspired by a famous designer and/or celebrity. The pink tree above represented Madonna's new junior line, "Material Girl" that is being sold at Macy's. I used to love that song! And this tree was so eye-catching with the pink lights, black ornaments and checkered bows.

So when I got home, I thought that making another Santa bag but in PINK would be fun!

Here it is:


Silver buckle shine!

Close-up of my sentiment

Back of tag sentiment

This bag will be given to my pre-teen Goddaughter,
and these are the goods she will be getting in it,
including a little Give A Little PINK Body Mist!

Supplies:
  • Cricut Art Philosophy cartridge for bag, buckle, tag and frame of tag
  • DCWV hot pink textured cardstock
  • DCWV black textured cardstock
  • White cardstock scrap
  • Silver cardstock (from individual sheets at JoAnn)
  • "Believe" (without 'I' inked) and "May all your Christmas Wishes come true!" sentiments from Scrappy Moms' Winter Wishes Stamp set
  • White feather trim cut by the yard at JoAnn
  • Stampin' Up Sticky Strip (to adhere feather trim)
  • Black Versa Ink
  • Ranger clear embossing powder
  • Marvy Uchida embossing gun
  • Hot pink snowflake ribbon purchased last year at Michael's (but may have this year)
I am entering this in Fantabulous Cricut's Challenge # 89 - Present Time and Scrappy Mom's Terrific Tuesday Challenge, Christmas!

Well, I think this might be it for today. I have two HUGE scrapbooking projects to work on tonight. I won't be able to post them either because they are a co-worker's kids' scrapbooks to update for the year. I have been doing this for several years now. My kids are barely scrapped, but this is so worth it given the extra dough it gives me at the holidays!

Have a wonderful week my crafty friends! Thanks for visiting!!

Basketball Ornament Personalized with Vinyl

Two posts in one afternoon?? WOW! Yep, Jen's catching up . . .

My younger daughter had an ornament exchange party to go to, so I wanted to come up with a fun ornament for her to exchange. Most of the girls that were invited are on her basketball team, so as I was shopping at one of my "happy places" Michael's, I found a good-sized basketball ornament for $3 in the value section. And with a 50% coupon in hand, it made my good find GREAT!!

Here's how I personalized it:

Their team name & years for this basketball season

Blue glitter ribbon used as the hanger!

On my tree with flash
(sorry for the glare!)

On my tree without flash


Supplies:
  • Cricut Birthday Bash cartridge for lettering (welded on my Gypsy)
  • Blue Oracel indoor vinyl (color known as Gentian on Expressions Vinyl website where I purchased it)
  • Blue glitter ribbon from Michael's current holiday ribbon selection
One note: I used the "hide contour" function on my Gypsy to get the hyphen between 11 and 12. I hid the dot in the exclamation point. :)

This was a super easy project. And my daughter returned from the party with rave reviews for the ornament. Apparently it was "stolen" often in their white elephant game. That's music to a crafter's ear!

More projects to post, so see you soon! Thanks for looking!!

"You're An Angel..." Teacher Treats

It is my younger daughter's class that will provide the teacher appreciation luncheon this month, so again I made little treats for each staff member's place setting. I had the forethought to ask when this one would be after my older daughter's last month and was able to pick up these mini bars on clearance at that time - Score!

This is what I came up with:

The front

Back with message to each staff member

All 40 treats!

Supplies:
  • Cricut Joys of the Season cartridge for angel cut at 1.5"
  • Cricut Christmas Wish Imagine cartridge for patterned paper (wrapper cut at 3x2.5")
  • White Colorbok textured cardstock purchased at Wal-Mart
  • Gold Stickles (for the angel's trumpet)
  • 40 Hershey mini bars
  • Little Days font

I finally caved and bought a Martha Stewart scoring board last week when they were the 50% off "Jingle Deal" at Michael's. I'm glad I did, because assembling these wrappers was a snap with that board! I think it only took me 2 hours start to finish to make these treats . . . unlike the turkey ones last month-Ugh!!

This was technically my first project with the Imagine. I wanted to print and cut an image from Christmas Wish, but that was a bit too complicated for someone who is short on time and has a project to-do list a mile long. I needed a "Robyn project" from My Pink Stamper - in other words, SIMPLE!! First I printed the blue pattern on this cartridge. I liked it, but I'm thinking that the luncheon will have traditional red and green Christmas colors decorating it, so I wanted to do green.

Then, my older daughter did it. She said the unthinkable to a crafter that was already questioning her decision. "Mom, don't you think this green is too Spring-y?" AHHHHH!!!! I was thinking the same thing, but all I can lean on was that it was on the CHRISTMAS WISH cartridge and that I had already used up a lot of ink printing 3 full 12x12 pages, so I went with it. She tried to redeem herself by saying, " Well the angel definitely says Christmas." Phew!! That did make me feel a bit better - LOL!
 
Now I'm out of kids and therefore DONE for the school year with teacher luncheons-YES!! I have more projects completed so I will be posting again soon. :)

Saturday, December 10, 2011

Nifty at 50 Birthday Card and Gift

Are any of you celebrating birthdays right in the middle of the Christmas season? Well I had yet another milestone birthday to celebrate this week - my Sister-in-law's!

For her gift, I went to one of my favorite stores, Bath and Body Works and purchased a shower gel, lotion, shimmer mist and lip gloss in their new scent, Vanillatini. It came out for the holidays, but in my opinion, it looks festive enough for a milestone birthday. And when it comes to choosing scents, I think vanilla always seems to be a safe choice unless you happen to know what the recipient likes. I did not in this case. I also purchased the gift bag from Bath and Body Works. This is where I got my color theme. The bag was more turquoise, the gift more teal, so I just mixed them together a bit.

Here is what I assembled for the card and gift:


Supplies:
  • Cricut Life's A Party cartridge for card base, Nifty at Fifty, 50, and inside circle cuts
  • Recollections black cardstock
  • Stampin' Up Taken With Teal cardstock
  • Georgia-Pacific white cardstock
  • "Happy, Happy Birthday" sentiment from Scrappy Moms' Simple sentiments stamp set
  • Stampin' Up Basic Black ink
  • Turquoise Stickles
  • Glittery turquoise blue holiday ribbon from Michael's
 
Since all of the cuts were from Cricut's Life's A party cartridge, the card was a snap to put together. I laid it all out in my Gypsy and had a card rather quickly. Love that!

I have a couple more projects to post and need to attend to a lot of crafting this weekend, so I will be back soon! Have a wonderfully crafty weekend!

Sunday, December 4, 2011

Dear Santa, define "good" . . . Christmas Card 2011

Ahhhh . . . the joys of teenagers, well almost teenagers. My girls sure look and act like teenagers already! And it seems like it came on SO quick! Where did my little girls go that I could dress up, do their hair and buy toys from their Christmas wish list??? Things that they play with now like iPods and laptops are NOT toys!! Yep, my little girls are gone. Now I have these "little women."

Since finding Scrappy Moms Stamps last Spring, I've always loved their Winter Wishes stamp set and knew I had to have it once it got closer to the Christmas season. In particular, their Dear Santa, define "good". . . sentiment just cracked me up. I've always stayed clear of using Santa on my cards (as you can see in my past cards post) because I never wanted to give the impression that he is the focus of my family's Christmas season. One friend used to always say that Santa was Satan with the letters switched around. But now that I am growing in my faith more than ever, I feel confident that I am still keeping Santa in perspective. Sure I love the magic part that Santa adds, but I know Jesus is the reason for the season! BTW, that is another sentiment on that Winter Wishes stamp set from Scrappy Moms. Great set, huh? :)

On to the card:

Front

Scrappy Moms sentiment heat embossed

Inside

Supplies:
  • Cricut Art Philosophy cartridge for the buckle
  • Stampin' Up Real Red cardstock
  • Georgia-Pacific white cardstock
  • Black cardstock scraps (belt)
  • Coredinations Foundations Golden Pearl cardstock (buckle) purchased as single sheets at Joann
  • VersaInk Black ink
  • Ranger clear embossing powder
  • Marvy Uchida heat embossing gun
  • Honey Script font downloaded from www.dafont.com
  • Mischievous photos of my girls and family taken by me - photo collage created and printed in matte from www.snapfish.com; family photo printed with a thick border then cut off to make the photo fit the 5.5" x 4.25" card inside.
We had so much fun taking our family photo this year. The Santa hats for the dogs were hysterical!! We just laughed and laughed! Here is a collage of the outtakes that I plan on scrapbooking  . . . someday. (insert heavy sigh here)


This is the first time in 11 years that we didn't take our Christmas photo in front of our tree. But since I wanted to do these Santa hats for the dogs, I thought we needed a more controlled environment to keep hold of them and their hats. I was right about that, but I must say I'm not fond of the way that me and my older daughter's faces look so much bigger than my husband and younger daughter's. I should have set that up a bit differently on the tripod. Oh, well. It was a good photo shoot. And quick, too! I really do think having the dogs trapped on our staircase helped! The poor things. Our black lab is 14.5 years old, too, so she really endured a lot for us. She's such a good girl.

I am entering my Christmas Card 2011 into Fantabulous Cricut's Challenge # 88 "Holiday Cards" and Cricut Cardz Challenge # 96 "Christmas: Say It with S!"  

Ok, enough babble. I have sooo many Christmas crafty projects I want to get to, so hopefully I will be getting to some of them this week. I hope your week is craft-tastic!!