Monday, February 20, 2012

Eeyore finally packaged up!

Happy President's Day all!

I'm so happy that my company is closed for this holiday. I LOVE 3-day weekends! One day for obligations (mine was a bball tournament . .  shocker, huh?), one day to get the house in order (i.e. laundry duty), and one day to PLAY! It's the perfect weekend amount in my opinion. :)

And since I had this extra time, I was FINALLY able to get the Eeyore note cards I started last month made and packaged up! See the original post HERE. I've been feeling pretty bad that I haven't been able to finish them for my pastor, but now I can officially cross them off my things-to-do list and give them away!

While finishing theses cards up, I decided to change the placement of Eeyore and the baker's twine so that Eeyore is "anchored" on the card. Here is the card re-done:


I made custom envelopes using the
Cricut Don Juan cartridge to fit the 4" card.

Part of the reason why I didn't finish this project
was that I didn't know what to do about envelopes.
I couldn't find envelopes to purchase that would fit
these 4" cards well. So I opted to make the
envelopes, but they did take some time.

Here are all six note cards with their custom envelopes.

I used Lick & Stick envelope glue on the envelopes.
It may be hard to see, but it's the shiny stuff
where envelope glue should go. :)

I put the note cards with envelopes in a clear 8x10 bag
and wrapped the excess around the note cards.
Then I tied baker's twine around and added the tag.

Here's a close-up of the tag using a
Scrappy Mom's sentiment of course!

Supplies for envelopes and packaging:
  • Eeyore 4" note cards (see previous post HERE for note card supplies)
  • Cricut Don Juan cartridge for envelopes (9.82" width 4.29" height sized on my Gypsy; I hid the score marks using the hide contour feature- otherwise the marks are cut and make the envelope look not so nice!)
  • Clear 8x10 bag (received as packaging for a recent Etsy order, but they can be ordered from Etsy as well)
  • Green Sneakers Lick & Stick remoistenable envelope glue 
  • Charcoal baker's twine purchased from Scrappy Moms
  • "With Prayers & Positive Thoughts" sentiment from Scrappy Moms' Everyday Greetings stamp set
  • Georgia-Pacific white cardstock scrap for tag
Well, off to go shuffle a kid around from her friend's house to her bball practice. Have a great week my fellow crafters!

Tuesday, February 14, 2012

Valentines for my Valentines

Happy Valentine's Day everyone!! Well, not for long, but the spirit of love should live on throughout the year, right? :)

I made a couple of valentines for my sweet valentines, my girls, last night. I know - Eleventh hour, right? Story of my LIFE lately!!!

Anyway, I wanted to jump into My Pink Stamper's 10,000 Hits/Pinkalicious Blog Hop challenge, so I made the cards to fit the challenge - make a project using red, a circle, pink ribbon, two My Pink Stamper stamps, and a diecut.

This is what I came up with:

Front

Side

Inside

Back

Supplies:
  • Cricut Birthday Bash cartridge for scalloped circle card base cut at 4 " and mat circle cut at 3.75"
  • Cricut Gypsy Wanderings for heart cut at 2"
  • Colorbok textured 12x12 paper purchased at Walmart
  • Stampin' Up Pretty In Pink cardstock
  • Stampin' Up Real Red cardstock
  • Cuttlebug D'Vine Swirls embossing folder to emboss pink mat circle
  • Stampin' Up Pretty In Pink 7/8"organza ribbon (purchased several years ago)
  • "Love Always" and "Handmade with love by" sentiment stamps by My Pink Stamper 
  • Stampin' Up Real Red dye ink
Simple, right? I left a lot of room on the inside of the cards to write a special message to each girl. The cards matched well with the gift bags full of girly goodness I gave them tonight. My valentines were spoiled with lip glosses, lotions, mini purse mirrors, cozy Aeropostale slipper socks, Aeropostale necklaces plus LOTS of yummy chocolates.

The My Pink Stamper set I used on the card is extra special because I won it at Robyn's class at CHA in July 2010!!

Emma of My Creative Time took this pic - so cool!!
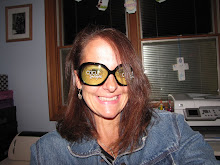
What a craft geek I am here - My Scrap Queen tee
from Michael's (pink of course!) and wearing my
Cricut Imagine bug sunglasses on my head-LOL!

It was so much fun to meet these crafty celebs in person. They were all so fun!

Well, I gotta hit the mattress ball as my awesome "Nawlins" friend would say. Have a good remainder to your week all!


Sunday, February 12, 2012

Lollipops of Encouragement!

This weekend my older daughter is participating in a huge basketball tournament - one that will help decide whether their team goes to State. So I thought that a yummy form of encouragement would be nice to give out on day 1!

Here are my quick and simple treats:

Here they all are - including one for each coach!

close up of an individual pop

"You can lick this tournament" was on each cardstock strip
and then personalized with each player or coach's name.

These could definitely be used for any theme.

Supplies:
  • Tootsie Roll Valentine lollipops
  • Georgia-Pacific white cardstock
  • Kristen ITC Font
  • Red and pink twine
I am entering this in Really Reasonable Ribbon's challenge # 41 "red and pink with ribbon."  I love ribbon, so I need to check this website out a little closer!  :)

Valentine Card 2012

Hello, my fellow crafters! I hope you are having a great weekend! It's a bit cold here, but the sun is blinding shining so that is encouraging. :)

Here is my Valentine card for this year sent out to close family and friends:

The front

Yes, I still torture my girls by taking photos
of them for each of these smaller holidays.
I've done this every year since my now 13-year old
was 1 month old! Of course the first couple of years
I took them to a studio, but that got expensive so
I started doing my own when the oldest was 3.

I had photo cards printed prior to 2005,
but then I started making my own after that. 
I posted my past cards HERE

Closeup of my "heartstrings" - I love this twine!

Inside

"Love the LORD your God with all your heart
and with all your soul and with all your strength."
Deuteronomy 6:5

Close-up of my girls' individual photos

The ensemble with matching labels & valentine stamps!

The back of the card finished off with a Scrappy Moms stamp!


Card supplies:
  • Black & white photos of my 2 beautiful daughters that are growing up WAY TOO FAST!!
  • Cricut Lyrical Letters cartridge for the hearts on my "heartstrings"
  • Georgia-Pacific white cardstock
  • Recollections red cardstock for front photo matting
  • Celebrate It Valentine ribbon from Michael's
  • Valentine Twist Divine baker's twine purchased from My Craft Spot
  • Gill Sans Ultra Bold font
  • Deuteronomy 6:5 bible verse
  • "Created by" stamp from Scrappy Moms' Everyday Greetings set 
  • Stampin' Up Real Red dye ink 
  • Christmas Red Stickles
  • Micro Glue Dots to adhere Stickled hearts to baker's twine

I am entering my valentine in the following awesome challenges:
Phew! So many many wonderful challenges! Thanks so much for visiting.
 
Have a very HappyValentine's Day on Tuesday!

Saturday, February 11, 2012

Cards from Valentine's Days Past

Like the holidays since last Mother's Day, I've been doing posts for my past cards as a resource for me on my blog.

Here are my cards from Valentine's Days in past years:

2005 - Front and Back
2006 - Front (Inside photo MIA)

2007


2007-inside


2008 - Front and inside

2009

2009 Inside

2010

2010 - inside


2011's card can be seen HERE.

For holidays like this, I only make cards for close family and friends, which totals 20 or slightly under.
Now I'm almost caught up with past cards to post! I just need to do Easter cards within the next couple of months. 

I should be back soon to post 2012's Valentine card that I've been working on this past week. Thanks for stopping by and looking at my old cards! :)

Friday, February 3, 2012

Beach Party Thank-yous

Happy weekend all!

I FINALLY got the thank you notes out from my daughter's beach party last night:

Here is a 4x6 group print adhered to one side
of the postcard-style thank-you.

And then on the other side was a wallet-sized photo of
the recipient with the birthday girl and the gift given.
Some personalized text to thank each girl for the
gift was either below or to the side of the photo. 

Lastly, I added a "Stickled" tropical flower from the Cricut
Life Is A Beach cartridge as an embellishment.

Supplies:
  • 4x6 group prints
  • Wallet-sized photos of birthday girl with each guest
  • Cricut Life Is A Beach cartridge for tropical flower
  • White Georgia-Pacific cardstock for cards
  • Orange Recollections cardstock scraps for flowers 
  • Orange Peel Stickles to bling up flowers
  • Beach Type Font downloaded free from the Internet

These thank-yous are simple, yet personal. I've always made a point of taking a photo of the birthday kid with the guest and the gift given. Then I don't have to write down the birthday gifts. For this party, my daughter was so trained that she initiated the pics with each friend! I guess she should be trained after 13 years- LOL!

Well, off to another basketball tournament tomorrow, but maybe I can work on those valentines sometime in the next couple of days. Thanks for stopping by! Have a great weekend!!

Wednesday, February 1, 2012

You've Been BUGGED!! ~ Valentine Office Fun!

Happy February, my fellow crafters!

Since it's the month of Valentine's Day already (YIKES!), I wanted to start the month off with a valentine-ish project. I sure do need to get going on my valentines, but they will have to wait until this weekend (insert deep sigh here). The girls' activities and my work have just had me too busy!!

Speaking of work, I wanted to perk up my office during the mid-winter blahs with a little fun similar to "You've Been Boo-ed!" that I did back near Halloween (See post HERE). I surfed and surfed the net and really couldn't find something like it for Valentine's Day. I liked the Cupid Poop poems, but I thought that it was boring for people to keep giving candy to each other.

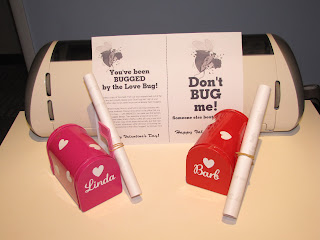
Soooo, taking off from the Boo'ed concept, I created this:


I think everyone will get a kick out of putting the
sign up by their desks that says "Don't BUG me!"
That will really show off our customer service- LOL!

One of the complaints from the boo'ed game in October was that people had to do two treats (and some people went overboard with what they gave), and also we started running out of co-workers to boo. So, I thought I would get it going by bugging two people, but then after that, each person would only have to assemble one treat. Hopefully this will work out better.
Here are my treats that I will secretly place on two of my co-workers' desks today:

This is how they will look when first given . . .


The pink mailbox!

Yep, still obsessed with vinyl! I had so much fun
with the mailboxes I decorated for Christmas gifts (HERE)
that I just couldn't pass up these Target dollar section cuties!

And the classic valentine red mailbox!

I will flip if my recipients win the $1000 a week for life!

This Target sticky note pad is so cheery-
much needed in our boring office! 

And could one ever go wrong with chocolate????

Here are the mailboxes dumped out . . .

Another fun sticky notepad from Target!

Supplies:
  • Cricut Quarter Note cartridge for name lettering (welded on my Gypsy)
  • Cricut Designer's Calendar cartridge for heart
  • Cricut white indoor vinyl
  • Metal mailboxes from the dollar section of Target
  • A rolled up copy of the sheet shown above rubber-banded to mailbox flag (I forgot to add it before I took pics, but I did add valentine ribbon from Michael's and tied it in a pretty bow which covered up the rubber band-Oops!)
  • Love Bug graphic found on the internet HERE
  • GeoSlab703 XBd BT font for headings
  • Kabel Bt BT font for body text
  • DelRay font for "Happy Valentine's Day"
  • Instant lottery tickets
  • Ande's Valentine mint chocolates with sweet thoughts/messages on them
  • Lindt Lindor chocolate truffles
  • Reese's peanut butter chocolate hearts
  • Sticky note pads from Target's dollar section
Hope you enjoyed and are inspired to start something fun like this in your own workplace! Help yourself to the sheet I created. All I ask is that you credit me and leave me a comment that you used it! I would love to see your take on it! :)

I am entering this fun "party-starter" in Decorate to Celebrate's Valentine Party challenge!

Thanks for stopping by!